During the morning session I removed the clamps from Jim’s stopper rack, sanded it again to remove any marks the clamps may have left and installed the hanger loops.
 Jim ordered this rack unfinished so he could paint it to match their décor. When we leave a piece unfinished, we stop working on it after the construction sanding (80 & 100 grit papers) and we credit back to our customer the amount that was billed by the shopping cart for finish sanding and applying the finish.
Depending on the finish you will be applying, Jim, you may need to sand it first with the finer grits reserved for finish sanding; 120, 150, 180 & 220. But for a paint, 100 may be fine, check your pain't instructions.
Then I boxed up the rack, ran a shipping label through UPS via our bookkeeping software and set the box out on the dock.
Lunch time!
After lunch I got started again on Mike’s cane/walking stick. Technically, this is a walking stick because it has a knob top, not a handle. Mike was good enough to allow us to set his order aside to work on these others since he was not in a tremendous hurry to get it; he has been learning to walk again after an accident which involved a motorcycle, a truck and Mike being hurled through the air over the trucks hood. He has progressed from wheel chair to walker to what he called an aluminum aircraft strut, and now feels he’s ready to get about with just a walking stick to steady himself.
 I stopped working on it a while back because I needed to search out a larger tool rest for my lathe. The rest that came with the lathe (the black one - left) is only about 6” wide. That is enough for the kind of turning I have done in the past, I just kept moving the rest as I progressed across a piece, turning the beads and coves and what have you as I went. But this stick requires a long, very slight taper – just 1/8” difference in diameter from one end to the other. That is just 1/32” taper for every 8” of length.
  Getting a smooth taper over that kind of length requires a tool rest long enough to slide the tool a fair distance, so I ordered the longest one that would fit my lathe: 10” (the silver one - right). It woks very well and I like the tubular design much better than the original rest, which is soft iron and tends to be nicked by the corners of the tools and need to be filed smooth again periodically. With the added width I can now fair out about 1/3 of the sticks length at a time. Much better.
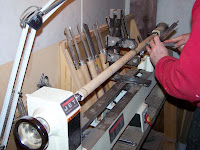 After mounting the stick between the drive spur and tail stock bearing, I mounted my steady-rest – that black thing about half way along the stick. It has two bearings on an arm below the work and one on an arm above, by placing the wheeled supports so they just touch the work I can prevent (or at least greatly reduce) the sticks’ tendency to “whip” as I turn it. Long thin spindles like this tend to flex, especially when a cutting tool is put to them. This flexing as they spin at around 2900 RPM causes, at best, a ridgey surface on the wood like that if a length of twisted rope, and at worse the spindle to break and come flying off the lathe at me. Which is very scary, so I try to avoid that!
Once it’s properly supported, I lay out the location for 5 sizing cuts; one at the base of the top ferrule, one at the upper edge of the lower brass tip and three more equally spaced between them. Diameter at the top ferrule is 31/32”, and 27/32 at the lip of the lower tip, that means that each cut will be 1/32 smaller than the previous one as I go from top to bottom. I use a pair of machinists calipers and a parting tool to cut these narrow grooves at each position, then remove the waste between each groove with a fingernail gouge. I finish up by smoothing the shaft with a skew chisel followed by 60, 80, 150 and 180 grit sand papers. The final sanding is done by hand (lathe off) and with the grain (lengthwise).
 Now it’s time to fit the ferrules to the ends of the shaft. The foot of the cane consists of a tapered brass cap, a threaded connector and a rubber tip. I taper the end of the shaft to match the taper inside the cap, then drill a ¼” hole in the end of the shaft with a drill bit in a stationary chuck mounted to the tail stock. Unlike most applications where the bit turns and the work is held steady, here the work is spun by the lathe and the bit in it’s chuck remains still as I feed it into the end of the shaft with the tail stock.
  The knob ferrule is not tapered, so it’s a little easier to get right quickly. Both the ferrule and the cap will be attached to the shaft with Epoxy. The threaded connector will also be glued into its hole and the tip can be threaded off for occasional replacement of the rubber tip. I’ll include one spare tip with the stick when I ship it.
And that is going to do it for today. Tomorrow I’ll begin finishing the stick with antique oil. That will take a couple of days at least; depending on how many coats it takes to get the proper finish.
 Next up: Gary’s cradles. I’ll be pulling lumber for those tomorrow. I should have done it yesterday, but we awoke to find it had snowed, and moving 10 foot long, snow covered, tin sheets around in 20 something degree weather is something I’d rather avoid. We’re supposed to be back up near 60° this weekend; I’ll just hold off for a day or two and find other things to work on in the mean time.
Doug
No comments:
Post a Comment
Appropriate comments are welcome. All comments are reviewed before being posted. Spam messages (anything not a direct discussion of this message) and all profanity will be deleted. Don't waste your time or mine by posting trash here.