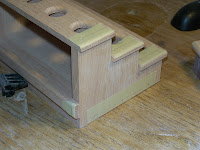
With the holes laid out I take the racks to the drill press and bore holes through the shelves into the side pieces. After putting glue in the holes a short piece of dowel is pounded into the hole until the sound changes, indicating that it has hit bottom. Then I use a flush cut saw to remove the excess dowel. A flush cut saw has no “set” to the teeth so it can cut next to the shelf surface and not chew it up. These pegs now help reinforce the rack’s structural integrity as well as adding a decorative touch.
When all the pegs are in for the first rack (Donna’s all red oak 3-tier) I sand it again to smooth the plug ends and take it into the finishing room for the first coat of lacquer. Then I peg David K’s 4 tier Cherry & Maple rack, and finally Daniel’s 3-tier standard (walnut & maple) rack. This is the order in which these folks placed their orders.
With a little luck all three racks will be ready for pick-up by FedEx on Monday.
What We’re Building:
Utility Trailer Make-Over for David B. - In Progress, sort of
4 Tray Tables, all walnut (custom size) with stand for Shelly - Building Jigs
3-Tier Bottle Stopper Rack, all red oak for Donna – In Progress
4-Tier Bottle Stopper Rack cherry & maple for David K. – In Progress
3-Tier Bottle Stopper Rack (Standard) for Dan G.- In Progress
Kitchen organizer - Marie B.- Producing Design
4 TV Tray Tables and stand in maple for Jeffrey P.
Computer Desk for Laptop for Marie B.
Printer Cabinet for Marie B.


No comments:
Post a Comment
Appropriate comments are welcome. All comments are reviewed before being posted. Spam messages (anything not a direct discussion of this message) and all profanity will be deleted. Don't waste your time or mine by posting trash here.