Over the past two days I have made good progress on making the tray tops.
 I started, on Monday, by taking the long trips I’d milled out previously for tray rails and laid them out for cross cutting into the individual rails. I’m milling the rails for each table from one long strip. By cutting them in sequence and keeping the pieces in order the grain of the wood will flow around the rail.
 After cutting to rough length, I trimmed them to width and planed them to thickness. Then I set up the table saw with a dado head and cut the big groove that will house the tray panel. That done, I turned by attention to cutting the backer boards for the tray panels from a 4’ x 8’ sheet of plywood.
This is one of the few uses we have for plywood and we must use it here to give the tray rails something solid to mount to. The ribbon panel, being solid hardwood, will expand and contract across the grain with humidity changes. If I glue the rails to that, the joints will pop loose and the tray panel will, more than likely, crack and split because it can’t move as it needs to. So we use a thin piece of plywood as a spine upon which we hang the rails, leaving the ribbon panel free to move. We use cabinet grade Birch plywood for this, not the cheaper construction grades. I prefer to use Baltic Birch plywood in my furniture, but with the weakening of the American dollar imported materials are becoming increasingly expensive. Baltic Birch is now outrageously priced – when I can even get it. Most of my suppliers have let it go out of stock and stay that way because of the price.
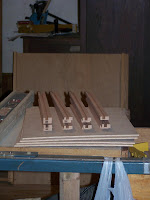
 Tuesday morning I came in and got right to work mitering the tray rails. I cut them a smidge over-size to start and sneak up on a perfect fit. A good miter fence, and very sharp saw blade help this process to go well.
  One work of sagely advice: if you want to mount a sacrificial backer to the miter fence, do it BEFORE you calibrate the gauge to the blade. When cutting at an angle, moving the work piece forward (away from the fence) will cause it to be cut shorter than you expect. No, I did not learn that the hard way, at least not this time. When test fitting, I use a clamp to gently draw the parts against the backer.
 Most of Tuesday was spent making ribbon panels. I start with the billets I milled out before. These pieces were chosen for the way the grain runs through the wood so that they will experience little if any tendency to cup. The broad faces of these billets have been surface planed perfectly smooth to serve as my glue joints. Now I use a thin kerf blade on the table saw to rip the billets into thin strips which get laid on their side to for the panels. B
 y keeping them in order patterns are formed in the wood that can paint some beautiful pictures.
After I have enough ribbons to make a panel I stop the saw and bind the strips together.with masking tape. I cut the tape at the center joint and mark the two half-panels for orientation. Then I take them into the assembly room where I have a glue-up station set up. The tent-like jig holds the panel for me with the joint I’m gluing opened up for easy access. I must work quickly and get the panel into the clamps before the glue starts to cure.
I have enough space to clamp up only two half panels at a time so while these two set up I go back to cutting ribbon strips and forming panels. After an hour or so I can remove the clamps, set the joined half panels aside and glue up two more.
When I’ve finished cutting and bundling the ribbon panels and still have a few more to glues up I clock out on Ira’s card and in on Pamela’s so I can begin her bottle stopper rack. Small projects like this are ideal as fillers for these otherwise wasted pauses in a larger project.
By day’s end all eight half panels are glued up and the body of Pamela’s rack has been cut out and glued up. I have accomplished my goals for the day and can now go home happy.
See you tomorrow!
Doug
 I started, on Monday, by taking the long trips I’d milled out previously for tray rails and laid them out for cross cutting into the individual rails. I’m milling the rails for each table from one long strip. By cutting them in sequence and keeping the pieces in order the grain of the wood will flow around the rail.
 After cutting to rough length, I trimmed them to width and planed them to thickness. Then I set up the table saw with a dado head and cut the big groove that will house the tray panel. That done, I turned by attention to cutting the backer boards for the tray panels from a 4’ x 8’ sheet of plywood.
This is one of the few uses we have for plywood and we must use it here to give the tray rails something solid to mount to. The ribbon panel, being solid hardwood, will expand and contract across the grain with humidity changes. If I glue the rails to that, the joints will pop loose and the tray panel will, more than likely, crack and split because it can’t move as it needs to. So we use a thin piece of plywood as a spine upon which we hang the rails, leaving the ribbon panel free to move. We use cabinet grade Birch plywood for this, not the cheaper construction grades. I prefer to use Baltic Birch plywood in my furniture, but with the weakening of the American dollar imported materials are becoming increasingly expensive. Baltic Birch is now outrageously priced – when I can even get it. Most of my suppliers have let it go out of stock and stay that way because of the price.
 Tuesday morning I came in and got right to work mitering the tray rails. I cut them a smidge over-size to start and sneak up on a perfect fit. A good miter fence, and very sharp saw blade help this process to go well.
  One work of sagely advice: if you want to mount a sacrificial backer to the miter fence, do it BEFORE you calibrate the gauge to the blade. When cutting at an angle, moving the work piece forward (away from the fence) will cause it to be cut shorter than you expect. No, I did not learn that the hard way, at least not this time. When test fitting, I use a clamp to gently draw the parts against the backer.
 Most of Tuesday was spent making ribbon panels. I start with the billets I milled out before. These pieces were chosen for the way the grain runs through the wood so that they will experience little if any tendency to cup. The broad faces of these billets have been surface planed perfectly smooth to serve as my glue joints. Now I use a thin kerf blade on the table saw to rip the billets into thin strips which get laid on their side to for the panels. B
 y keeping them in order patterns are formed in the wood that can paint some beautiful pictures.
After I have enough ribbons to make a panel I stop the saw and bind the strips together.with masking tape. I cut the tape at the center joint and mark the two half-panels for orientation.
 Then I take them into the assembly room where I have a glue-up station set up. The tent-like jig holds the panel for me with the joint I’m gluing opened up for easy access. I must work quickly and get the panel into the clamps before the glue starts to cure.
I have enough space to clamp up only two half panels at a time so while these two set up I go back to cutting ribbon strips and forming panels. After an hour or so I can remove the clamps, set the joined half panels aside and glue up two more.
When I’ve finished cutting and bundling the ribbon panels and still have a few more to glues up I clock out on Ira’s card and in on Pamela’s so I can begin her bottle stopper rack. Small projects like this are ideal as fillers for these otherwise wasted pauses in a larger project.
By day’s end all eight half panels are glued up and the body of Pamela’s rack has been cut out and glued up. I have accomplished my goals for the day and can now go home happy.
See you tomorrow!
Doug
No comments:
Post a Comment
Appropriate comments are welcome. All comments are reviewed before being posted. Spam messages (anything not a direct discussion of this message) and all profanity will be deleted. Don't waste your time or mine by posting trash here.