Thursday, November 29

Sanding Scott & Cheryl’s Legs

No, no… that’s not some sort of sadistic hair removal method; I’m referring to the legs for their tables.

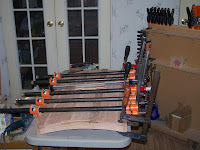
The process involves this jig I built, a power sander and a respirator. The jig and the portable vise hold a leg so I can run the sander over the upper face in one long uninterrupted sweep. Otherwise there’s not much to say. The purpose here is to remove milling marks, fuzzy bits, pencil lines and knock off the sharp corners. More refinement will be done when I do the finish sanding. As I get the matched pairs sanded I go ahead and install the pivots so they stay matched up. For those that will not be stained I also pre-finish the area inside the pivot joint. This way I can be sure there will not be any unfinished wood left hiding inside the joint after I shoot the tables with the HVLP spray gun… those pivot points can be pesky this way.

Once the sanding was done on all of these I turned again to Mikes walking stick. And quickly ran into a problem. The tool rest I have is only 6 inches wide. The stick I’m turning is about 30” long. Normally, if turning a spindle or post this is not an issue, I just move the rest along and work on one section at a time. But here I’m to turn a long, smooth taper; no beads, coves, or any features of any sort just a taper from 1” diameter at one end to just under ¾” diameter at the other end. Getting this long of a taper smooth and even would be much easier to do with a wider tool rest. So I went on-line to look for one at my usual tool stores. They all carry the lathe, but no tool rests. Humph! I’ll work on ferreting out one of these this weekend; I should have plenty of time.

Tomorrow (Friday) is my day at Treasures, and Saturday I'm standing in for somone who just had surgery so the shop will be closed until Monday.

Hope you have a great weekend!

Doug

Wednesday, November 28

Rounding the Stick and Making Legs

I started off this morning by marking up Mikes stick to find the center of each end and punching the center to make a dimple for the spur on the drive center and the tail stock center.

Hickory is one of the toughest woods around. They use it for things like axe handles because it is so tough. Part of this toughness comes from the fact that the fibers in the wood are interlocked. Think of a bundle of drinking straws; in most woods the straws lay neatly next to one another. In hickory the straws are all twisted around one another, making it difficult to separate one or a group from the rest.

Because of this locked together grain, hickory can be difficult to turn; it doesn’t shear away real well… especially at the very beginning when I’d be turning it from a square piece to a round piece. As those corners come flying around and slamming into the chisel, it will want to tear chunks off. To reduce this, I cheat. I first round the blank down by running it through the router table a couple of times to take most of the corner off.

I find that a hidden knot that came to light when I cut this piece of hickory from the larger piece is not going to hold together, so I dig it out and fill the void with Epoxy putty that I color with black universal tint powder. This will make a very solid, durable patch that will still look like a small pin knot. Most of it will be turned away as I round the blank and add the taper toward the bottom.

Then I tap the drive spur into the upper end and mount the piece on the lathe. I have to wait for the epoxy to harden, so I turn my attention to Sheryl’s and Scotts tables. Today I’ll make the legs.

It is decided that since I’m making tables anyway, I may as well make a couple of extra sets… Christmas draws neigh.


The first step is to get out my template set. This collection of patterns contains all the information I need to make a set of tray tables, no paper plan is needed.


Making the legs means I sort through the lumber and find good straight boards, cut them into lengths, rip them into 1”x1” blanks, surface plane these to the proper thickness and bore 6 counter bored screw holes in each pair of legs. I spend the afternoon working on the walnut legs for Cheryl’s and Scotts tables, these I make from scratch. After supper I finish up making the legs for an oak set and a cherry set. These legs I had cut long ago when we made a large batch of tray table sets – I think we made six or seven sets that time, and I cut some extra legs and rails thinking that it would give me a jump on the next order we got. Unfortunately all the orders we’ve gotten since have been for walnut. So I’ll use them now.

That’s enough for today.

See you tomorrow!

Doug

Tuesday, November 27

Re-grouping


Today was one of those “catch-up” days. I spent the morning doing the bookkeeping that I didn’t do at the appointed time because I was rushing to meet a deadline. I also brought in walnut lumber for a couple of TV Tray Table sets; one for Scott and one for Cheryl. Then I cut into a large piece of hickory I brought in last week and rouged out a blank for Mike’s walking stick.

No, I’ve never turned a walking stick before; this will be a first. But Mike is a good guy, and he needs a good stick, so I am happy to help out. Mikes stick needs to be 35” tip to top to fit him properly, so I lay-out where to cut off the turning blank so that the finished stick will be the right length. Then I cut it off.

And THEN I got busy cleaning this place up. For the past week or so I’ve been putting 12 to 14 hour days, most of the time leaving without cleaning up the shop first. All that accumulated saw dust and assorted tools scattered about makes my work just a bit more difficult, so it’s high time this place got cleaned up. The girls came around to say “hey” so I put them to work. Dolly stayed to help – or at least to keep me company, Zadie snuck off. Too nice a day to be stuck in doors.

I doubt that you’re interested in the details; cleaning is cleaning. Tomorrow we’ll get back to woodworking. As for tonight, I’m going to get out of here at a normal hour and go relax a bit.

See you tomorrow!

Doug

Monday, November 26

Reassembly and Crating

Now that the lacquer is good and hard it’s time to put all the hardware back on the trunks. That goes much more quickly this time because the screw holes are already there so it is a simple matter of getting the right piece of hardware back in the right spot and installing the screws.

The next step is to open up the trunks and pack the tray so that it does not bounce around inside during transit. I do this with Styrofoam and bubble wrap. Then lock the lock and wire the keys to the lock bail for easy access when they get “home”.

Then I take some careful measurements and build a base for the crate, move the trunks onto it and strap them together with cellophane with Styrofoam between them. Then I begin sheathing the pair with sheets of foam.

That done, I cut the panels of crate board to make the container, and finally apply the wooden banding.

All that remains is to run the bill of lading and shipping labels and load it into our truck for the trip to White Pine and Old Dominions truck dock.

They’re on their way Lynn… hope they meet with your client’s approval.

Doug

Friday, November 23

Staining - Cherry

The plan was for me to be elsewhere today, but God had a different idea and so I’m here and working. I got the maple trunk stained antique cherry and it is sitting in the finishing room to cure out. Tomorrow I will shoot the lacquer on both trunks, then they will be ready for reassembly.

See you tomorrow!

Doug

Wednesday, November 21

Staining - black

I started out the day bright and early by stripping off the hardware Marie and I worked so hard last night to install and do the final round of finish sanding on the oak trunk. At least all that hardware will be easier to re-install now that the screw holes are in place.

Then it’s into the finishing room with it, one piece at a time. The oak trunk gets a treatment where I apply flat black paint, let it set for a few minutes, then wipe it back off so the grain shows through the remaining paint. Much like applying a stain, except that it is more difficult to work because it wasn’t made to be used this way. There are tons of nooks and crannies to work the stain into (and get it back out of) so this is a time consuming process and I have to work on smallish areas at a time or the paint sets up too much and I can't get it back off properly. When I finish the top of the lid I set it aside and put the box on the table to start working the outside.
I wasn't sure if Lynn wants the inside of this one black as well or just the outside, so I called her. The cherry one I would assume would be inside and outside, but I like this one with the rustic black outside and the fresh oak inside.

Once the outside is done I give the paint a chance to get dry to the touch so I can start to roll the box around and stain the inside. Since that was Lynn's decision. Then I can set the box aside and work on the tray. While the tray is drying, I put the maple trunk up on the table and strip the hardware off of that one.

If you look close you will see that I’ve tagged each piece of hardware for location and orientation and I keep all the hardware for each trunk in separate trays. This way I can be reasonably assured that it will all go back on just as it was.

When the black paint is all dry, and I’ve finish sanded the maple trunk I bring the parts in for a coat of sealer as preparation for the antique cherry stain.

But that will have to wait until next time for I’m being told that the shop is closing at 7:00 tonight so we can prepare for Thanksgiving tomorrow.

Hope you have a great Thanksgiving!.

Doug

Tuesday, November 20

Finish Sanding & Techno Frustration

I spent most of today sanding and inspecting the two trunks. Not exciting. Not photogenic. Tiring. I spent the morning working on this; complacently bored.

At lunch time, things got exciting again. Yes, my lunch was good, but that wasn’t it. I got a call from a customer saying that he had sent me an e-mail and it had bounced saying my mail box was full. Wanted to know why I’m not checking my e-mail. I assured him that I check my e-mail several time each day, but I had not gotten any new e-mails since yesterday… I’d investigate.

It got messy from there. You don’t want to know the details, I’m sure. Technological spaghetti. One thing leading to another. I expected to find that an e-mail server had gone down, but it was much worse than that and much harder to pinpoint. Fixing the problem(s) involved an IM conversation with a programmer, a few phone calls to tech support personnel, and eventually, moving the entire website, database and e-mail system to a new host server. This used up a big chunk of the afternoon. Time I really couldn’t afford to spend because of the deadlines we’re under… but necessary if we’re to keep Smoky Mountain Woodworks up and running. And *that*, we have to do.

That’s done now, everything should be OK in a couple of hours when the new location propagates through out the Internet, so I’m going back to sanding. Boring, blessed, peaceful sanding!

Looks like a late evening again as I try to get back the lost time. I’ll post this now so I don’t forget to do it later.

See you tomorrow.

Doug

Monday, November 19

Final Assembly

I didn’t have much time to take pictures today, had to keep my nose to the grindstone, these HAD to be assembled before I can go home. Marie helped out and we got all the construction done.

Tomorrow we begin finish sanding.

See you then.

Doug

Friday, November 16

Assembling Lids

The question has been asked why sometimes I talk about building four trunks and why sometime just two. The reason is that when Lynn – who is a consultant working with a furniture store in Chicago – first approached us about making some trunks she wanted four of them, and she needed a discount. By making parts for four trunks at one time, we can create a time savings over having to make four trunks individually. That is because it takes time to set up and tune each tool we use for each process. If we make all the parts needed while the tool is set up, that goes more quickly thus we can offer a discount on multiple items ordered at once. Not a tremendous discount mind you… but something.

Well, we quoted her a price based on four trunks but when she actually placed the order she only wanted two. To get the price point we were aiming for we need to make four trunks, so I’m milling out parts for four trunks, but when I get to the assembly stages I’m only building the two Lynn wants because she’s in a rush to get them. I’ll assemble the other two as I have spare time.

Huh… yeah… spare time… that’s a good one!

So, today I assembled (with glue and screws this time) the lid assemblies and squared them up. Doesn’t sound like much, does it… but it was a task and a half wrapping that top plate onto the support ribs and getting everything just where it needed to be. Then, once it was all in place and clamped, the clamps had to stay in place until the glue was completely dry or it would all pop loose again. The screws are installed after the lid is assembled as insurance.

I also made the parts for the trays that sit in the top part of the trunks.

Fortunately, Marie had an early meeting in Knoxville this morning so she was on the road and I was in the shop by 6:30. That extra couple of hours will help me get out of here on time this evening since it’s Friday and Marie and I have a standing date on Fridays. Don’t want to be late!

See you Monday,

Doug

Thursday, November 15

Lid Parts

Before I get started on today’s posting, let me remind folks who are peeking in here to see if their order has been started yet that our production schedule is available on the In The Shop page of our web site, Click Here to go there.

The dates shown as projected completion dates are estimated by our software based on the orders that have been placed the number of ManHours required to build each and the number of hours in our work week. The software that runs behind the web site is terribly complicated and is somewhat limited in what it can do. For instance, the production hours for a project don’t change as we perform the work on a project. A project that takes 30 hours will show 30 hours until we complete it and its status changes from Construction to In Transit, then all 30 hours come off the schedule in one lump sum.

It also doesn’t keep the orders in the proper numeric order, so it looks like someone may have jumped in line ahead of you. I have a programmer working on that issue now.

‘Nuff of that.

Today after removing the clamps from the complete oak trunk carcass I went back to making lid supports, and immediately twisted off a screw – oak does that if I don’t wax the screws first. I forgot – getting in a hurry because the deadline for this project is looming and Lynn is anxious.
Today I completed making the lid support rails, made the lid end pieces and rounded over the undersides of the lid rails so they fit into the radiused notches in the lid supports.

Then it was time to test fit all these parts together. Here I have the framework and end caps fitted together.

This is with the filler panels in place but the end capes moved aside. Fitting is good, now I take it all apart again and put it together again with glue and clamps. That will take the rest of this evening and most of tomorrow.

I’ll check in with you again then.

It's been another long day, time for some rest. G’nite!

Doug

Wednesday, November 14

Carcass Two

The morning session was spent gluing and clamping the maple trunk carcass together and installing the tray support rails. It took nearly all of my pipe and bar clamps to pull the corner post joint together snugly in both directions. Once it was all together I checked it for square, adjusted the clamps a little then left it alone to let the glue tack up securely.

In the mean time I made the arched lid support pieces. This has notches in it where the lid rails cross the supports. I attach a template to a pre-tenoned blank with a couple of wood screws and bandsaw around the template being careful not to cut into my template but also not to leave too much wood.

The next step is to trim the part to finished size on the router table fitted with a flush trim bit. The pilot bearing at the top of the bit rides on the template so the router cuts away all excess wood. Too much wood means the bit will burn and need to be replaced. When I’ve routed all around the template I remove the screws and attach the template on the next blank to do it again.

That done I mill the parts for the floor panel of the oak trunk.

When the day is done both trunk carcasses are complete and I’m ready to start on the lid. But that will have to wait until tomorrow, it’s getting late.

See you tomorrow,

Doug

Tuesday, November 13

Carcasses

I started the day by making up the upper side panels for all four trunks. The blanks for these had been milled out previously, I just needed to do the final shaping. As you can see, there is some interesting shaping to them. The bit groove down the middle is where the tray support ledge goes, as shown in the top piece.

Then I sand all the panel parts. That takes the rest of the morning. Once all the sanding is done I start test fitting the panels into the rail & post assemblies. I’m still not using any glue, not until I’m sure everything will fit as it should.

Once I’m sure, I break out the glue pot, remove just the posts from the assembled panels one at a time, put glue on the tenons of the rails and reassemble. During reassembly I must make sure that the groove in the bottom rail mates up perfectly with its counterpart in the corner post, and that the upper and lower rails match up with the top and bottom of the post, and that when it’s all assembled it is square. I check this by measuring across the diagonals. If they’re not right on, I adjust the clamps to pull it into square. They’re rarely off by more than a 16th of an inch.

This consumed the afternoon.

The evening session was spent making the floor panel for the maple trunk. Normally this would be plywood and would require only a couple of minutes to cut the piece, sand it and pop it into the grooves. But we avoid plywood when ever we can, and this is an instance when we can. Instead I cut a series of slats about 3½” wide that will run across the short distance of the trunk. Then I mill a 1/8” groove down the center of both long edges of all the slats. Then I put a small chamfer on both edges up the upper surfaces. Finally I cut some 1/8” splines, sand everything and assemble. No glue.

The slats are not glued together. The splines keep them aligned and will prevent gaps from opening up between them when the slats shrink because of reduced humidity. This makes for a pretty and sound bottom to the trunk. The bottom assembly will sit in the grooves in the lower rails, enclosed on all four sides, but will not be glued to anything.

And that does it for another day. Tomorrow I’ll glue the assemblies together into a completed carcass.

See you then!

Doug

Thursday, November 8

Fit & Finish

I started the day by applying the second round of shellac to Mark’s cremation urn. It turned out well, a nice matte finish, nothing glitzy since Mark’s mother (Anthony’s Grandmother) would prefer something simple. I gave that a couple of hours to harden up well, rubbed it out to get the matte finish (shellac is a glossy finish) then packaged it up and sent it off to Massachusetts.

Then, finally, I get busy fitting the steamer trunk case rails into the corner posts. The first step in this is to plough a groove on the inside face of the lower rails that perfectly mates up with the dado on the lower ends of the corner posts. This will house the trunks bottom plate. I set up the stacked dado head and make a test cut in some scrap wood. Perfect the first time!

Then I can start fitting rails to posts. I work with one panel at a time, then put the panels together into the box for the trunks. The splined miter joints in the corner posts have not been glued yet – none of this has been glued yet, we’re just fitting.

That done, I take measurements and trim the filler panels to size. Next time we will sand them smooth and fit them into the rail construction.

But that is for next time. Tomorrow is my every-other Friday that is spent at Treasures, so I’ll see you Monday.

Doug

Wednesday, November 7

Getting ‘er Done

Today I set out to complete Mark’s cremation urn. I needed to cut the pieces for the bottom and the top, so the first step is to calibrate the miter gauge so precise cuts are possible. This needs to be done whenever I change a saw blade because not all blades are the same thickness. I do it by setting the stop to 12” on the scale, hold my 12” steel rule between the stop and the blade, then unlock and slide the fence so that the steel rule just fits between the blade and stop. When it’s just right, lock down the fence on the miter gauge again and we’re ready for some precision work.

I cut the blank for the bottom piece a bit over-sized; about 1/8”. Then take some careful measurements of the inside of the rabbet that will house the bottom plate. In a perfect world, this would have come out to be a perfect 8 1/8” square. And it almost is… one corner is off by 1/32”. I could try to shave that out of the edge of the rabbet with a chisel, but this honey locust is so hard and difficult to work with that I’d rather take another approach. So I sneak up on a good fit by shaving first 1/16” off of two adjacent edges of the bottom piece, then step it down to taking just 1/32” for a perfect fit – except that one corner. To handle that, I carefully mark the corner that needs shaving down, then put it back into the miter gauge with that corner out front next to the blade. Then I slip a 1/32” shim behind the corner diagonally opposite the corner to be cut. This “cocks” the piece out just enough to shave off that one corner, yet retains a straight edge. It works well and the bottom piece pops in for a snug fit.

I repeat this process for the top piece.

Once it’s cut, it’s time to round-over some edges with the router table. The top piece (or lid) pokes up above the upper edges of the side to provide a slightly decorative point for the top using a double round-over. I also round over the corners of the sides just a little so they aren’t so severe. I dislike sharp corners.

I also make the little tab pull for the top, and round-over the edges of that. Then I fasten everything together. Because this box is meant to be bio-degradable, only wooden fasteners are being used; splines to lock the liter joints and wooden pins to secure the bottom plate and handle. No metal or plastic.

Then I set up the finishing room and make the shellac. This finish is made up from dry flakes as needed. I put three thin coats on the entire box, then let it set up to harden well. Being alcohol based, shellac dries quickly, so three coats took very little time to apply, but before I sand it down and apply three more coats, I want to make sure the finish is hard, not just dry to the touch. I’ll do that tomorrow.

The rest of the day was spent answering a lot of phone calls and making and testing a routing template for the steamer trunk lid support pieces. We’ll get to those tomorrow as well.

But that’s about all the time I’ve got for today.

Doug