To start the day off I had some bookkeeping to do – it’s tax time for us; we want that refund. So I spent a good part of the morning working on that stuff. Where oh where are my aspirin?
Throughout the day I was sporadically occupied by a number of phone calls, one was an order for the adult size Nanny Rocker we just added to the web site – which is good, the others weren’t bad news, so that too is good. I also needed to help Tim with the last of the clean-up chores out front. And I packed up Nitaya’s bag handles. And Warren’s phone order (Nanny Rocker) needed to have all the processing that would normally be done automatically by the web site done manually, and a quote on shipping needed to be run. In between all this, I managed to get some woodworking done, but it was like dancing a jig with all the changes in direction through the day.
 So Naturally I decided to start the day’s woodworking by using a couple jigs to lay out the drawer hardware. The first one sits on the drawer front and locates the drawer pull. This jig works only with the library pulls, of course. I use a punch to lay out where the screw holes will be, then drill the pilot and shank holes. Being small, solid brass (thus soft) standard slot screws the pilot and shank holes need to be properly done or they will twist off.
I should note that Nance wanted antique brass library pulls on her table, antique brass has not been available to me, so was not a listed option. She followed directions and used “Custom” as her option selection. When this is done, the cost of the pulls (which is not yet known) is not added to the tables price – that cost is added manually when the pulls are purchased. This is detailed on the hardware selections page, but I thought I'd toss it out here as well.
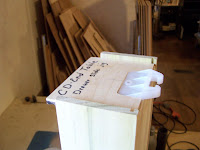 The other jig is used to lay out the claw that guides the back of the drawer.
 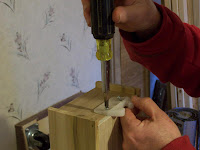 Again it is a simple device which fits to the back of the drawer and allows me to punch through the screw holes in the claw, one of which is incorporated into the jig, to locate the holes needed in the drawer back. Then I drill the pilot holes and attach the claws with pan head screws. Much faster and surer than trying to lay out each drawer with a ruler and pencil.
 As the drawer boxes had their claws mounted I began attaching the drawer fronts to the boxes. This is done just with glue, the fancy lock-tongue joint holds fast without nails or screws.
  Once the glue is in I draw the parts together gently with clamps and leave the clamps in place long enough for the glue to grab. Because I don’t have all the clamps a woodworker could dream of having (who does?) I have to let the first ones set up a bit then reuse the clamps that came off of the earliest drawer to clamp another. I have enough of this particular clamp to clamp up 4 drawers. While I was waiting for glue to set up, I’d go work on something else for a few minutes, come back do another drawer, and go back to something else.
 At day’s end I’ve got most of the drawers in their holes for a test fit. Remember that I have not yet stained the cabinet.
Time for some supper.
This evening I will be back to work some more on the bottle stopper racks for Dave and Dave. How do you like that; two guys order bottle stopper racks at the same time and they’re both named Dave. These three racks were supposed to be done and out of here this weekend, but the tree fallout has tended to throw me off track a bit. Marie and I are planning on spending the weekend in here to get caught up.
See you tomorrow.
Doug
Throughout the day I was sporadically occupied by a number of phone calls, one was an order for the adult size Nanny Rocker we just added to the web site – which is good, the others weren’t bad news, so that too is good. I also needed to help Tim with the last of the clean-up chores out front. And I packed up Nitaya’s bag handles. And Warren’s phone order (Nanny Rocker) needed to have all the processing that would normally be done automatically by the web site done manually, and a quote on shipping needed to be run. In between all this, I managed to get some woodworking done, but it was like dancing a jig with all the changes in direction through the day.
 So Naturally I decided to start the day’s woodworking by using a couple jigs to lay out the drawer hardware. The first one sits on the drawer front and locates the drawer pull. This jig works only with the library pulls, of course. I use a punch to lay out where the screw holes will be, then drill the pilot and shank holes. Being small, solid brass (thus soft) standard slot screws the pilot and shank holes need to be properly done or they will twist off.
 I should note that Nance wanted antique brass library pulls on her table, antique brass has not been available to me, so was not a listed option. She followed directions and used “Custom” as her option selection. When this is done, the cost of the pulls (which is not yet known) is not added to the tables price – that cost is added manually when the pulls are purchased. This is detailed on the hardware selections page, but I thought I'd toss it out here as well.
 The other jig is used to lay out the claw that guides the back of the drawer.
  Again it is a simple device which fits to the back of the drawer and allows me to punch through the screw holes in the claw, one of which is incorporated into the jig, to locate the holes needed in the drawer back. Then I drill the pilot holes and attach the claws with pan head screws. Much faster and surer than trying to lay out each drawer with a ruler and pencil.
 As the drawer boxes had their claws mounted I began attaching the drawer fronts to the boxes. This is done just with glue, the fancy lock-tongue joint holds fast without nails or screws.
  Once the glue is in I draw the parts together gently with clamps and leave the clamps in place long enough for the glue to grab. Because I don’t have all the clamps a woodworker could dream of having (who does?) I have to let the first ones set up a bit then reuse the clamps that came off of the earliest drawer to clamp another. I have enough of this particular clamp to clamp up 4 drawers. While I was waiting for glue to set up, I’d go work on something else for a few minutes, come back do another drawer, and go back to something else.
 At day’s end I’ve got most of the drawers in their holes for a test fit. Remember that I have not yet stained the cabinet.
Time for some supper.
This evening I will be back to work some more on the bottle stopper racks for Dave and Dave. How do you like that; two guys order bottle stopper racks at the same time and they’re both named Dave. These three racks were supposed to be done and out of here this weekend, but the tree fallout has tended to throw me off track a bit. Marie and I are planning on spending the weekend in here to get caught up.
See you tomorrow.
Doug
No comments:
Post a Comment
Appropriate comments are welcome. All comments are reviewed before being posted. Spam messages (anything not a direct discussion of this message) and all profanity will be deleted. Don't waste your time or mine by posting trash here.