This morning I started out by packaging up Carol’s bag handles and shipping them out – they were my evening (after hours) project last night. I still have 3 more pair of bag handles and 3 bottle stopper racks to build during these overtime sessions.
A couple more web site updates to do, then I was making sawdust.
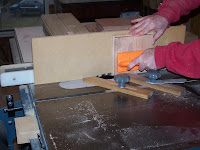
 Today I make and test fit the drawer box parts. I start by cutting the blanks I’d prepared for drawer fronts into the squares that are the individual fronts – as I lay them out and cut them I mark them as to which row and position each will occupy. Things are just easier doing it this way.
Once the drawer fronts are cut I swap put the table saw blade for a dado head and set it up and tune it for ¼”. Then I begin cutting dadoes on the side pieces.
 Because I make the drawer sides by resawing a 4/4 piece of lumber into two thinner pieces I end up with matched pairs of parts. I take extra care to keep these paired up and properly oriented. I doubt most people notice that the grain and coloring in their drawer sides match on each drawer, but I do and I get some satisfaction out of these little niceties.
 Here’s a little better shot of how these lock joints I’m about to make fit together. The drawer sides will not be as tall as the drawer front – that would make it very difficult to lift your CD out of the drawer, and make it darker in the drawer, thus harder to see things. To help both of these, the drawer sides are just over half the height of the fronts.
 I set up the fixtures to hold the drawer side parts in position to cut the grooves in precisely the right location, one for the front, and one for the back.
  Then I cut a shallow rabbet around all four sides of the drawer fronts. This allows part of the front to slip inside the grid openings so they don’t protrude so far. This also gives me material to work the lock joint into.
 Next I install a taller fence fixture to support the fronts as I mill the deep grooves in the side edges of each front.
  I have to pay attention here – these grooves go ONLY in the sides, not the top or bottom. When I’m done they look like this. Finally I trim the inner wings to the proper depth. The one on the left has not been trimmed, the one on the right has.
Then I remove the dado head and put a good sharp saw blade back on to cut the 1/8” grooves for the bottom piece. In the past I’ve used 1/8” Baltic birch plywood for drawer bottoms. But these drawers are narrow enough that I can make them out of poplar like the sides. I mill out ¼” thick plates then cut a rabbet along both sides and the front. This forms a tongue that will fit into the grooves in the side panels and front. The back is a different story. I’ll show that to you later, but in case a bottom ever breaks we don’t want it to be totally encased in the drawer box, it needs to be removable so it can be repaired or replaced. I’ve never had one break, but…
A couple more web site updates to do, then I was making sawdust.
 Today I make and test fit the drawer box parts. I start by cutting the blanks I’d prepared for drawer fronts into the squares that are the individual fronts – as I lay them out and cut them I mark them as to which row and position each will occupy. Things are just easier doing it this way.
Once the drawer fronts are cut I swap put the table saw blade for a dado head and set it up and tune it for ¼”. Then I begin cutting dadoes on the side pieces.
 Because I make the drawer sides by resawing a 4/4 piece of lumber into two thinner pieces I end up with matched pairs of parts. I take extra care to keep these paired up and properly oriented. I doubt most people notice that the grain and coloring in their drawer sides match on each drawer, but I do and I get some satisfaction out of these little niceties.
 Here’s a little better shot of how these lock joints I’m about to make fit together. The drawer sides will not be as tall as the drawer front – that would make it very difficult to lift your CD out of the drawer, and make it darker in the drawer, thus harder to see things. To help both of these, the drawer sides are just over half the height of the fronts.
 I set up the fixtures to hold the drawer side parts in position to cut the grooves in precisely the right location, one for the front, and one for the back.
  Then I cut a shallow rabbet around all four sides of the drawer fronts. This allows part of the front to slip inside the grid openings so they don’t protrude so far. This also gives me material to work the lock joint into.
 Next I install a taller fence fixture to support the fronts as I mill the deep grooves in the side edges of each front.
  I have to pay attention here – these grooves go ONLY in the sides, not the top or bottom. When I’m done they look like this. Finally I trim the inner wings to the proper depth. The one on the left has not been trimmed, the one on the right has.
Then I remove the dado head and put a good sharp saw blade back on to cut the 1/8” grooves for the bottom piece. In the past I’ve used 1/8” Baltic birch plywood for drawer bottoms. But these drawers are narrow enough that I can make them out of poplar like the sides. I mill out ¼” thick plates then cut a rabbet along both sides and the front. This forms a tongue that will fit into the grooves in the side panels and front. The back is a different story. I’ll show that to you later, but in case a bottom ever breaks we don’t want it to be totally encased in the drawer box, it needs to be removable so it can be repaired or replaced. I’ve never had one break, but…
 The joinery in these drawer boxes is actually pretty complex, and it must all fit just right, as you can see. I set things up carefully, but still have to do a fair amount of hand fitting, especially for the front.
 Another problem that comes up on the front is that because the drawer box does not come all the way up the sides of the drawer front, the joinery is left open here.
  Not a major deal, but it just looks awkward. I could set up a complex jig to remove the unneeded tongues on the router table, but I find it more expedient to use the little bits that I cut off of the inner tongue to simply fill the groove. Like this.
 Because there were a number of phone calls to deal with today (including one fellow who wanted to know if I’d make him 275 SETS of TV Tray tables) I did not get all of what I had planned to do done – I lack the drawer back pieces. Otherwise the drawer boxes are built. They’re not done; I still have to make the system that will hold your CD’s up in a less than full drawer, and everything needs to be sanded, and because this piece will be stained – and the poplar drawer boxes never get stained, just the oak parts – The fronts will have to be stained before I can glue them together permanently. For that I need to know Nance’s selection of color.
Tomorrow is both Valentines day and Marie’s birthday, so you can bet that I will not be coming over to the workshop. She has plans for me. So I’ll see you again Friday.
Till then,
Doug
No comments:
Post a Comment
Appropriate comments are welcome. All comments are reviewed before being posted. Spam messages (anything not a direct discussion of this message) and all profanity will be deleted. Don't waste your time or mine by posting trash here.