Friday, February 29

Boxing ‘Er Up

The day started with a trip into Newport to visit Bryant & Pack Lumber to get the 1x6 – 10’ pine lumber I use for crates. Spruce lumber is a fair bit lighter than pine, but it is also almost 3 times the price, so what little we’d save on shipping costs by shaving a few pounds off a crate this size is lost to the added expense of lumber.

Upon my return I brought the new boards in and began building the base of the crate. Like so many things people build, a good foundation is important if the crate is to protect Nance’s CD End Table all the way to Texas. All our crates incorporate a pallet style base with cut-outs that allow a floor jack or fork lift to get under it and lift. The base itself uses two layers of wood, the outer layer provides most of the strength and a lip for the side panels to hook into, the inner layer offers a lip for the floor of the crate to sit on.

When we start a crate Marie often admonishes me with, “It’s JUST a crate, not a piece of furniture, don’t make yourself crazy over it.” And I try, I really do, but I find myself fussing over things anyway. Oh, well.

Once the base is completed and squared up I bring crate board in from the big shed. This stuff is ½ inch thick, triple layer corrugated cardboard that we get from International Paper in Morristown TN. It offers the same puncture resistance and vertical crush resistance as the ¼’ luan plywood we used to use but is considerably lighter than plywood, less expensive and easier to work with to boot. Plus, being cardboard it recycles easily. There is no down side. What I’m working with here are actually scraps from the last project we shipped. This crate board comes in 9 foot by 16 foot panels which can be a bit tricky to handle in confined spaces. These smaller “scraps” are much easier to work with, yet are plenty big enough to get the pieces I need out of.

For anyone who wants to try crateboard in their shipping here are a couple of tips:
1) A drywaller’s square (that big blue T-square) helps a lot in laying out good square panels.
2) Use a good utility knife with replaceable blade, and replace the blades often. Paper dulls a knife blade faster than you might believe and a dull blade make for more work and crooked cuts.
3) Cut through the board in multiple cuts. Just score the cut along the pencil line with the first cut, then use two or three more passes to complete the cut. On the final pass make cure you have a piece of scrap under the board you are cutting so you don’t cut into your bench.
4) Always orient the corrugations vertically; these are what give you the crush resistance should the truck line set something heavy on top of your crate as it’s being shipped. In a crate this size the wooden banding will easily handle the load, but in larger pieces, this factor will be important.

Once the side pieces are cut I begin constructing the blocking that goes inside to keep the End Table positioned and lining them with foam rubber. The panel waiting for the web cement to set up is the front panel with recesses that snuggle around the drawer pulls to put pressure on the drawer fronts so they don’t move around.

Building these side panels and the blocking takes a while; lots of measuring and custom fitting, but also the spray adhesive we use to hold it all together needs to set up about 10 minutes to reach maximum strength before we put the pieces together. That slows things down.

The next step is to attach the wooden banding. Again we use the spray contact cement for this. We start with the band around the top of the sides so the top band will sit on top of the vertical corner pieces, which sit on top of the base, so any downward forces are fully transmitted from the very top right to the base (and the floor) protecting the crates contents. To attach the vertical corner pieces I remove the side panels and use spring clamps to make sure we get good contact between crate board and wood the full length.

And that’s it. It took almost 7 hours to build this crate, but it’s easy work. I’ve heard from some customers who say they put the crates back together after removing their furniture and used them as a playhouse, doghouse or something similar – seemed a shame to just toss them out. Being cardboard, they won’t stand up to rain and snow for long, but you may do what you want with it. If you’re going to toss it, please knock the lumber off of it and recycle the cardboard. Most recycling programs accept corrugated cardboard now.

UNCRATING INSTRUCTIONS

To open the crate you will need only a #2 Robertson (square drive) screw driver. Using this tip in a reversible power drill or power screwdriver will make the task easier. There is no need for hammers or pry bars as these may damage the table inside.

1) Remove the 8 silver screws and the 4 connector plates from around the base of the crate. These hold the sides to the base so the whole thing can be lifted by the top or sides without separating the top part from the base.
2) Remove the 12 screws from around the perimeter of the top plate and lift the top panel off.
3) Remove the 4 screws from each corner post. Tip each side panel out and lift it up and free of the base. Be careful with the front panel, those Library Pulls like to snag in the foam. Be sure the bottom row are clear before yanking the panel loose or you may damage something.
4) Sometimes a little adhesive gets into the joints between the panels. If you’ve removed all the screws but two panels won’t separate, simple apply slow pulling pressure to both panels until the adhesive pops loose. Crowbars, hammers or dynamite are not necessary.
5) That will leave your table sitting on the crate base, ready to be lifted off and carried inside your home. All the packing will pull away with the crate panels. The table itself weighs only 52 pounds, so it will be easily carried by two healthy individuals, or one good burly one. Just watch the drawers, they’ll want to slide out if the table is tipped forward. Also, check the crate base after you've removed the table to be sure no shelf pins bounced out of the drawers during shipment.

Once your table arrives, we’d very much like to know that it arrived safely. Your comments on the condition of the crate will help us decide if the carrier (trucking company) is doing a good job as well as if our crates are effective enough. And of course we’d love to get your comments of the table itself. We thrive on compliments, but all constructive criticism has helped us refine the product and add new and better features over the years.

By logging into the web site you may leave a Product Review that will be attached to the CD End Table item and available to others who may be considering this product. If that is too much trouble, just send us an e-mail. We’re grateful for any comments you offer.
Now I’m off to run cost bids from the trucking companies. We have used Old Dominion Truck Lines exclusively for the past 7 years and they have served us well; not a single piece we’ve entrusted to them has been damaged in shipping, but their prices have been creeping upwards to the point that our customers have started clutching their chests and falling of their chairs gasping when they see the shipping cost estimate.

I was recently exchanging e-mails with Jon of Cove Hill Furniture and the issue of shipping costs came up. He recommended R&L Carriers; the service he uses. So I’ve been looking into that carrier. They do offer lower rates, all of their trucks are equipped with lift gates and they don’t charge extra to use them, or to make an appointment for delivery. In fact, their customers I’ve talked to (hey… when I applied for an account they wanted references on us, so it’s only fair that we check their references, right?) all say that the company seems to embrace the small accounts and are more user friendly than the more industrially focused freight lines. They have a pretty cool history too, you can read all about it by [clicking here] if you like.

Nance, I'll be e-mailing you with the final arrangements.

Have a great weekend!

Doug

Wednesday, February 27

DONE!

During this final day of finishing/assembly I started out by shooting the casework with semi-gloss lacquer. As with each part, it got one full coat, let it dry, shoot a second coat, let it dry, scuff sand to smooth the finish, tack it off to remove the dust and shoot a third coat.

When the finish was dry I installed the drawer slide rails, mounted the apron, and installed the top plate – which had been completely finished separate from the case so I could get to the inside of the case more easily.

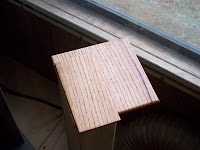
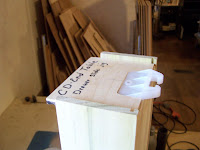
One quick note about the top plate: I use special steel fasteners to hold the top in place yet allow it to expand and contract with the atmospheric humidity. These clips are pretty strong and I used a fair number of them. The lip that sticks out on both sides and the front make tempting hand holds when you are moving the cabinet around. While the cabinet is empty this should be fine, but once you've filled it up with a million pounds of CDs, move the cabinet by lifting it from the bottom, don't lift it by the top or you may rip the top fastener clips loose. That would be bad.

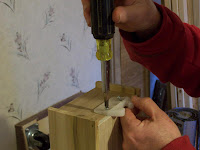
Now it’s time to mount the drawer pulls – but alas my collection of screwdrivers does not include one suitable to drive the itty bitty little straight slot screws that came with the pulls. I thought I had one, but I don’t. Solution…

Make one! I took the closest screwdriver I did have and filed it (carefully) down to size for a perfect fit. It worked well and I managed to install all the screws without stripping out any of the screws. Always a good thing, but difficult with these old fashioned straight slot screws. A pull of the screw across a block of beeswax helps to lubricate it as it goes into the wood, and of course I did pay particular attention to drilling proper sized pilot and shank holes, so all went very well.

Then I decided to go the extra step and cut little cards to go into the card holders. They slip out the top of the holder so you can easily write on them. If you rearrange later and want to make new cards, I used file card stock, just use the old ones as patterns for the new ones.

The final parts to intall are the drawer glides that sit in the lower corners of the grid opening to give the drawers a slick surface to slide on and to space them properly in theor openings. These are "tack-in" glides with small nails molded into the glide, so they need to be lightly hammered into position. But with this small of a drawer opening there is no room to swing a hammer. I learned long ago that I could use a piece of scrap hardwood as a caul to hammer on outside of the case and transfer the force to the glide. I round the edges a bit where I hold it or the hammering cuts into my fingers. I wouldn't want to do this all day, but for a few drawers it's a quick and effective workaround.

And that is all there is… it’s done. All that remains is to build a custom crate and hand it off to the truck line and it will be on its way to your house Nance! I will have to go to the lumber yard tomorrow morning to buy crating lumber, but I have crate board on hand. But before I crate it up I want to give it a night to sit so the lacquer hardens up fully.

So, we’re done for the day. I’ll clean up the shop and head home for supper.

Doug

Tuesday, February 26

Staining Completed

I had planned to get the three bottle stopper display racks for Dave and Dave completed over the weekend , and Marie and I got quite a bit done on them Saturday, but my plan to finish them up Sunday got scuttled so I had to push that off to Monday. Promises were made as to their delivery date so they could be used in a show. The mission was accomplished and all three racks are on their way.

This morning I lacquered the panels that I stained last time then began assembling the case for the final time. Once the case was all glued together I took it into the finishing room and stained the rails and stiles. No worries about getting stain on the already stained parts because the lacquer allows me to wipe it right off if I drip.

The stain needs to set up overnight. So I finished out the afternoon by “antiquing” the brass library pulls. This is done by immersing the pulls in a bath of an acid solution, waiting until the proper color has been attained, then transferring them to a bath of water and baking soda to neutralize the acid, then drying them with a soft cloth.

After they dry completely I shot them with a light coat of gloss lacquer to protect the finish. Here you can see the antiqued pulls, one of the Antique Brass shelf pins I’ll be using is below them for color comparison, and a raw, bright brass pull is in the bag at the top. I’m pleased with the results… and yes, I remembered to antique the screws too!
Time to clean up and head home for some supper. See you tomorrow!

Doug

Friday, February 22

Staining the Case

I came in early this morning (5:30) to get a head start on the book keeper stuff that has been piling up on the desk so that would not take time away from the woodworking because I have a good deal to accomplish today and will not have an after-supper shift to fall back on.

I started by lacquering the drawer fronts. The color sample boards came back from Nance (thank you for your diligence in this) so I took the opportunity to test the color of the parts I’d already stained. This may not look to be the right color on your monitor, but by laying the sample on top of the drawer front you can see that they are the exact same color. I love it when that happens.

The entire day was spent sanding and staining the case parts. I started with the top plate, which has been sitting around here for weeks now, having gone through periods of dry weather and very wet weather and it has not curled up any corners or bowed. It should be good and reliable as long as you don’t do anything silly like sitting it in front of a window where the sun will blaze in on it or on top of a heat vent. At least don’t do these things for a couple of weeks to give it a chance to adjust to it’s new home.

I sand each component through all the grits then tack it off and take it into the finishing room for staining. The casework framing I sand as a unit to be sure the joint faces are even and smooth then take the case apart to sand the narrow inside faces of the rails and stiles where they snuggle up around the panels. The panels get sanded separately and will be stained AND get 1 coat of lacquer before I put them back into the casework for final assembly.

I’m using the power sander on these larger parts and assemblies because… well... because I’m lazy. But the final sanding on all parts is done by going back with the final grit to sand it again by hand and with the grain to make sure there are no swirls left by the sander.

By close to days end I have all the panels, the front grid and all rail and stile interior edges sanded and stained. These will now have to set up for a minimum of 8 hours before I can do anything more with them.
The drawers are done except to mount the library pulls, but since I need to "make" them I'll wait on that for just a bit -- until the finishing room is not so crowded The chemicals used to 'antique' the brass pulls can be rather noxious and I'll be wanting to keep that contained and away from the general work space.
So, I’m going to call it quits a little early this evening so I can get this place cleaned up and I’ll be ready to go when my sweetie comes to fetch me.

Have a great weekend!

Doug

Thursday, February 21

Doing an Irish Jig

To start the day off I had some bookkeeping to do – it’s tax time for us; we want that refund. So I spent a good part of the morning working on that stuff. Where oh where are my aspirin?

Throughout the day I was sporadically occupied by a number of phone calls, one was an order for the adult size Nanny Rocker we just added to the web site – which is good, the others weren’t bad news, so that too is good. I also needed to help Tim with the last of the clean-up chores out front. And I packed up Nitaya’s bag handles. And Warren’s phone order (Nanny Rocker) needed to have all the processing that would normally be done automatically by the web site done manually, and a quote on shipping needed to be run. In between all this, I managed to get some woodworking done, but it was like dancing a jig with all the changes in direction through the day.

So Naturally I decided to start the day’s woodworking by using a couple jigs to lay out the drawer hardware. The first one sits on the drawer front and locates the drawer pull. This jig works only with the library pulls, of course. I use a punch to lay out where the screw holes will be, then drill the pilot and shank holes. Being small, solid brass (thus soft) standard slot screws the pilot and shank holes need to be properly done or they will twist off.

I should note that Nance wanted antique brass library pulls on her table, antique brass has not been available to me, so was not a listed option. She followed directions and used “Custom” as her option selection. When this is done, the cost of the pulls (which is not yet known) is not added to the tables price – that cost is added manually when the pulls are purchased. This is detailed on the hardware selections page, but I thought I'd toss it out here as well.

The other jig is used to lay out the claw that guides the back of the drawer. Again it is a simple device which fits to the back of the drawer and allows me to punch through the screw holes in the claw, one of which is incorporated into the jig, to locate the holes needed in the drawer back. Then I drill the pilot holes and attach the claws with pan head screws. Much faster and surer than trying to lay out each drawer with a ruler and pencil.

As the drawer boxes had their claws mounted I began attaching the drawer fronts to the boxes. This is done just with glue, the fancy lock-tongue joint holds fast without nails or screws. Once the glue is in I draw the parts together gently with clamps and leave the clamps in place long enough for the glue to grab. Because I don’t have all the clamps a woodworker could dream of having (who does?) I have to let the first ones set up a bit then reuse the clamps that came off of the earliest drawer to clamp another. I have enough of this particular clamp to clamp up 4 drawers. While I was waiting for glue to set up, I’d go work on something else for a few minutes, come back do another drawer, and go back to something else.

At day’s end I’ve got most of the drawers in their holes for a test fit. Remember that I have not yet stained the cabinet.

Time for some supper.

This evening I will be back to work some more on the bottle stopper racks for Dave and Dave. How do you like that; two guys order bottle stopper racks at the same time and they’re both named Dave. These three racks were supposed to be done and out of here this weekend, but the tree fallout has tended to throw me off track a bit. Marie and I are planning on spending the weekend in here to get caught up.

See you tomorrow.

Doug

Wednesday, February 20

Sanding & Staining Begins

This day started with gluing the cabinet corners together. I still have a lot of sanding to do, so the cabinet is not going to stay together, but these joints can be glued and screwed together and the screw hole plugs inserted so the whole thing can be finish sanded. The side and back assemblies will still come apart at the mortise & tenon joints to work with the panels and case parts. Once it was all glued up I checked to be sure it was staying square while the glue dried.

Most of the rest of the day was spent sanding the drawer fronts. All done by hand because the parts are so small. I set up three sanding blocks with the three grits of paper I would be using so instead of changing the paper on the block, I just grabbed a different block. This way I can sand each drawer end completely and when I set it aside it’s done.

This evening I blew off the sanding dust then set up the finishing room to stain the drawer fronts. I haven’t gotten the stain sample boards back yet so I have no reference to compare the color with to make sure it’s on target, but this brand of stain is usually pretty consistent in color from batch to batch.

I do the inside faces first; apply stain, let sit for a while, wipe off the excess, then let this face dry enough I can turn them over and repeat the process on the outside face. By doing the inside first, if anything does get buggered up it will not be as noticeable because it’s on the inside.

I will not stain the whole inside of the case because that is just absolutely pointless and a waste of time, materials and your money. Unless you pull the drawers out and peer inside with a flashlight, you’ll never see any of that. I’ll stain what is visible, including with the drawers open. Everything does get a finish however. It’s important to have the same amount of finish on the inside as the outside so water vapor from the air is absorbed equally or it will bow.

And that does in another day.

See you tomorrow.

Doug

Tuesday, February 19

Case Assembly

Yesterday I said that today should be more normal… it was not. Still dealing with the aftermath of this fallen tree thing. Nothing horrible, just time consuming.

I did get a good chunk of time to myself this morning and I used it to scuff sand and assemble the drawer boxes then press all 108 sleeves into their holes in the drawer box sides.

It got wacky after lunch. In between other things I did manage to flip the table case upside down on the top plate and install the fasteners that will hold the top in place yet allow it to expand and contract. These heavy steel clips fit into a narrow slot cut into the side and back pieces. The top will not be glued to the casework because it must be able to “move” or it will crack.

Then I counter bored the screw holes that will attach the side panels to the front grid and the pack panel. These parts will get glued together because expansion is not a problem here. The last task was to bore the front apron for pocket hole screws. This piece will be attached with just screws not because of expansion but because should you ever break a drawer track on the lowest row of drawers, this piece would have to be removed to replace the broken track. So, screws only here. The screws are on the rear face of the piece so you won’t see them at all.

And that will do it for today.

See you tomorrow.

Doug

Happy Hoodie Hoo Day

Northern Hemisphere Hoodie-Hoo Day

February 20th is Northern Hemisphere Hoodie Hoo Day. On this winter day people go out at noon and wave their hands over their heads and chant "Hoodie-Hoo".

It is a day to chase away winter and bring in spring. So if you are sick and tired of winter and a little crazy from being cooped up inside all winter join in the Hoodie Hooing at noon on Wednesday the 20th.

Here in East Tennessee winter has not been nearly as rough as it has in other parts of the country, in fact it’s been pretty pleasant – for winter. But then, it is quite pleasant here nearly all the time.

Oh, and no; I do not place any faith at all in such superstitious practices (I trust God to see to look after me) -- I just like the name and thought it'd give you a chuckle too.
Doug


Monday, February 18

Fussy Fitting the Grid

The electricity siphon I set up worked well enough to keep me going this morning by providing power to run a set of halogen work lights – it’s cloudy today and not much sunlight available, so these were essential. It is, however fairly warm (for February) which is a blessing since this place has electric heat – thus no heat until the power is restored. It also powered the router when I needed it, but the rest of what I’m doing this morning is hand work with chisel, mallet and a flush cut saw.

The morning was spent fussy fitting the front grid work then, when it’s completed, gluing it together. Just a few clamps were needed to hold key points together. I’ll sand it tomorrow after the glue has set up good and hard.

Ron Munn of Munn Electric and his guys showed up earlier than I had expected and got right to work replacing the broken pole and repairing the broken conduits and fixtures. The result looks better than it was before. I’m very grateful to them for coming out on a holiday to get this done. The electric company came later in the afternoon to put the wires back up. We were back to full functionality by around 3:00. Good job guys!

While I waited for them, I glued the drawer backs into the drawer sides and used the extension cord to power my router to round over the inside upper edges of the drawer box. Not a necessary step, but it looks nicer and helps your CDs to slide back into the drawer more easily instead of getting caught of the square edges that would otherwise be there. I install a temporary front piece on the box before routing.

A little more sanding to clean up the freshly routed edges and the box parts are ready to go into the finishing room for a coat of lacquer. I remove the bottoms and finish them separately so they can expand and contract without pulling a sliver of unfinished wood into view – they are finished full width.

Between lacquer shoots I started pressing the support pin sleeves into the holes on the drawer sides. I use a hard maple hand screw clamp for this to prevent marring the outside of the drawer and to get the pressure needed to seat the sleeves fully. If they aren’t pressed all the way in the protruding part will interfere with the CDs – there’s not a lot of extra width here.

And that is all for today. Tomorrow should be more normal, and I’ll get more woodworking accomplished.

See you then.
Doug