As of December 31, 2010 we closed down the custom furniture part of our business because the harsh economy simply sapped the life right out of it and I needed to look in another direction for income. I left this blog active because I figured I'd still post articles when I built items for on-hand stock, but I want to do these posts differently.
The old way of doing things; posting a daily progress report was fine when my audience was primarily folks popping in every day or two for an update on the current project, but it is an awful means of archiving project files. Everything is ankles over knickers. You come in at the most recent post and have to work your way backward through the list to the beginning. Finding the beginning of any particular project so you can work your way through the articles chronologically is almost impossible on older posts. And then we have multiple articles on some projects because each customer wanted to watch THEIRS being built.
I'm going to change the lay-out and post one long article for each new piece I build. This way you start at the top of the article with the beginning and read down the page to the end. But some folks are antsy and don't want to wait for me to finish the project and post the completed article, so I will include a link at the top that looks like this: [New Stuff] click that and it will take you past the stuff previously posted and straight to the newest addition. I'll remove it once the article is complete. If you miss a few days, well, you're on your own there.
Since most of my audience is now coming from Kindle subscribers and referrals from wood working magazines, this format will be much easier for them to make use of. between projects, I'll go back and convert the older articles to this new lay-out.
That's where we are and what-up ahead. I'm working on the first installment now. See you there!
Wednesday, July 13


Wednesday, April 6
Tray Tables - Packaging completed.
I gave the tables until after lunch to cure. By then they seemed to be hardened up well.


For the same purpose I fill the air space along the sides with shredded paper. Then I can lay in the final sheet of foam, close up the flaps and tape the box up securely.
All that remains is to set the box on the scale to get a weight - which is really quite irrelevant because the package is over-sized, so I will pay for 70 pounds of shipping even though the box only weighs half that - and run a shipping label.

A pick-up has been scheduled for tomorrow. I’ll keep the vicious, horrible, killer dogs inside the shop tomorrow (they won’t like that) so the FedEx man does not risk his life to get the box and it will be on it’s way to Jeffrey. Hope you enjoy them Jeff.
Now I’ll pull more foam out of the shed loft and bundle Shelly’s tables. Then I can determine the minimum size box I’ll need so we can go box hunting.
Thanks for reading!
Tray Tables - Packaging
Today we’re sliding into home on Jeffrey’s tables, Shelly’s are just behind.

The first thing I need to do is to crawl up into the loft of the lumber shed and pull down a half-sheet of Styrofoam, my box of Styrofoam scraps, and a flattened shipping box. We bought these boxes from a box maker specifically for this purpose. Each of our major products has a custom shipping container made for it. We store the boxes flat, as they came from the manufacturer, and fold them out into boxes only when we’re ready to put a product into them.
We used to be able to buy something called “whiteboard” from the lumber yards: a 3/4” thick, 4 foot x 8 foot sheet of plain Styrofoam. These cost me between $4 and $5 a sheet. But recently the lumber yards have switched to a product that has a silver Mylar film on one side and a clear plastic film on the other and costs $17 to $20 per sheet. This distresses to us as we have no use for these insulative films - indeed we have to peel them off and dispose of them - and the added cost is most unwelcome.
Packaging suppliers will sell us sheets of the old style foam, but bundles of them have to be delivered by truck; generally semi-tractor trailer truck. That means high shipping costs and having to go meet the semi at a truck stop to transfer their load to our truck because a semi can not get up to our shop to unload. Even just driving along
Piney Mountain Road
Piney Mountain Road
We would like to switch to the corn starch foam that dissolves away to nothing when it gets wet. The cost of this product has been prohibitively high when compared to whiteboard, but is about comparable to the new insulative foam boards. If we could find a local supplier (meaning within an hours drive or so from here) we’d just make the switch and everyone would be better off.
I mount a special extra-fine saw blade on the table saw, set the fence for a 24 inch cut, peel the films off the half-sheet of foam, and cut it in half.

The first pieces I need will be 24” x 36”. The 24” dimension is done, but my table saw does not have the 54” wing that would allow a cut of 36” between blade and fence, so I lay out my cut and set the fence to the width of the excess instead. The excess piece is then cut down to 10½”. The cut-offs from that step will become pads between tables. Nothing is wasted.
I push the flattened box out into a 3 dimentional shape and fold the bottom flaps over. Then I grab my packaging tape gun and triple tape the bottom, center seam; single tape the end seams just so they don't snag as the box gets slid along things.

I flip the box over and drop one large pad in the bottom of the box and set the two end pads in place. Now I’m ready to bundle the tables.
I retrieve the tables from the finishing room. Before I start pressing foam to poly I do a quick test. In an inconspicuous spot; a corner, I press the tip of my pinky finger against the polyurethane finish firmly. If a ridgey fingerprint remains when I take my finger tip away, and it does, then the poly is not cured yet.
It is dry to the touch, but not cured out hard yet. In this state, fumes escaping the finish as it cures could soften the Styrofoam pressed against it and cause it to mar the finish. The temperature got down to the middle 30’s last night, apparently it got cold enough in my finishing room to slow the curing of the poly. I move the tables into a room with more heat and turn up the furnace to help the poly to finish curing quickly. It may only take a couple of hours.
Tuesday, April 5
Tray Tables - Finished Finishing
I shot the walnut tables with their third coat this morning (did not get that far last night) That gave them a few hours to cure out a bit before I applied the polyurethane.
 Here I have the maple tables lined up ready for their skim-coat. I apply the poly with a cloth pad, using a figure-eight pattern, and check my work by bouncing a strong light off the tray tops. Any skips or swirls will show up as a dull spot on the shiny wet finish.
If it's good, I fold up the table and set it out of the way. The skim coat is too thin to run.

When The maple tables are done, I set up the walnut tables and coat them. As each table is completed, I fold it up and stand it facing the wall to prevent air-borne dust from landing in the sticky polyurethane.
Lacquer dries very quickly, the poly will take around 8 hours to "dry". It's not really a drying out process like the lacquer is where the liquid carrier evaporates out, but a catalyzing process where elements in the polyurethane hook up and combine as the solvent evaporates. In any case, it will take 8 to 12 hours for the poly to harden enough I can start packaging to the tables for shipment. If I go too soon the Styrofoam pads between the tables will dissolve a little in the uncured poly and mar the finish. We don't want that. In cold weather getting Poly to cure can be a pain, but it's not cold now so it should go well and I can start packaging in the morning.

If it's good, I fold up the table and set it out of the way. The skim coat is too thin to run.

When The maple tables are done, I set up the walnut tables and coat them. As each table is completed, I fold it up and stand it facing the wall to prevent air-borne dust from landing in the sticky polyurethane.
Lacquer dries very quickly, the poly will take around 8 hours to "dry". It's not really a drying out process like the lacquer is where the liquid carrier evaporates out, but a catalyzing process where elements in the polyurethane hook up and combine as the solvent evaporates. In any case, it will take 8 to 12 hours for the poly to harden enough I can start packaging to the tables for shipment. If I go too soon the Styrofoam pads between the tables will dissolve a little in the uncured poly and mar the finish. We don't want that. In cold weather getting Poly to cure can be a pain, but it's not cold now so it should go well and I can start packaging in the morning.
Monday, April 4
Tray Tables - Lacquering Continues
Today I will complete the lacquering of these tables... I hope. We have a storm front moving in that is promising high winds and tunderstorms. When we get those conditions here in the mountains we generally lose our electricty for a while. Hopefully I'll get it done before that happens. Weather Radar shows that the storm is moving in faster than was predicted... but I will try.
 Jeffrey's Maple tables had two coats on when I started the day, Shelly's Walnut table had one coat. I'm spraying the second coat on the walnut tables now. As each dries I move it out of the finishing room and store them on the stand. While waiting for lacquer to dry, I'm scuff sanding the maple tables so they will be ready for their third and final coat.
While the lacquer on each of those dries, I'll scuff the walnut tables and send them in for their third coat. Then all will be ready for their skim coat of polyurethane.
 Jeffrey's Maple tables had two coats on when I started the day, Shelly's Walnut table had one coat. I'm spraying the second coat on the walnut tables now. As each dries I move it out of the finishing room and store them on the stand. While waiting for lacquer to dry, I'm scuff sanding the maple tables so they will be ready for their third and final coat.
Friday, April 1
Tray Tables - Lacquering

Now I just take the pieces to be finished into the finishing room. The doors are kept closed at all times to keep wood dust from migrating in. In that clean environment I can spray finish, then go back out to the shop and continue woodworking. In this case, I am sanding more tables.

Once the third coat has hardened up well (overnight) I'll apply a skim-coat of quality polyurethane to just the panel tops of the trays to help protect them from careless living. Lacquer is a beautiful finish, but it will take on white water marks if sweaty drink glasses or hot plates are left sitting on it. The polyurethane helps prevent that.
The polyurethane has to cure for at least 8 hours - more if it's cold or damp - before I can begin packaging the table set for shipment.
Thursday, March 31
Tray Tables - Walnut Stand

Finish sanding requires sanding everything carefully by hand with 150 and 180 grit papers. When that's done I'll vacuum and tack rag all 10 pieces and prepare for shooting lacquer.
I will lacquer both sets of tables at the same time.
Wednesday, March 30
Tray tables - Maple Construction Done


Monday, March 28
Tray Tables - Assembling Tables
This being Monday, I spent the morning doing our weekly radio program, but then put in a long afternoon to get as much done as possible.
 I started by sanding the leg mount blocks, pre-finishing their inner faces and installing them on the legs.
Than I sanded the latch blocks, doing the final shaping on the latch tabs.
 Finally I glued the leg blocks and latch blocks to the undersides of the table trays, creating fully assembled tables.
 These are Shelly's oversized walnut tables.
 Jeffrey's maple tables will remain in clamps all night to allow the glue to set up good and hard before I plug the screw holes.
All that remains now is to assemble the stands and construction will be complete.

Than I sanded the latch blocks, doing the final shaping on the latch tabs.

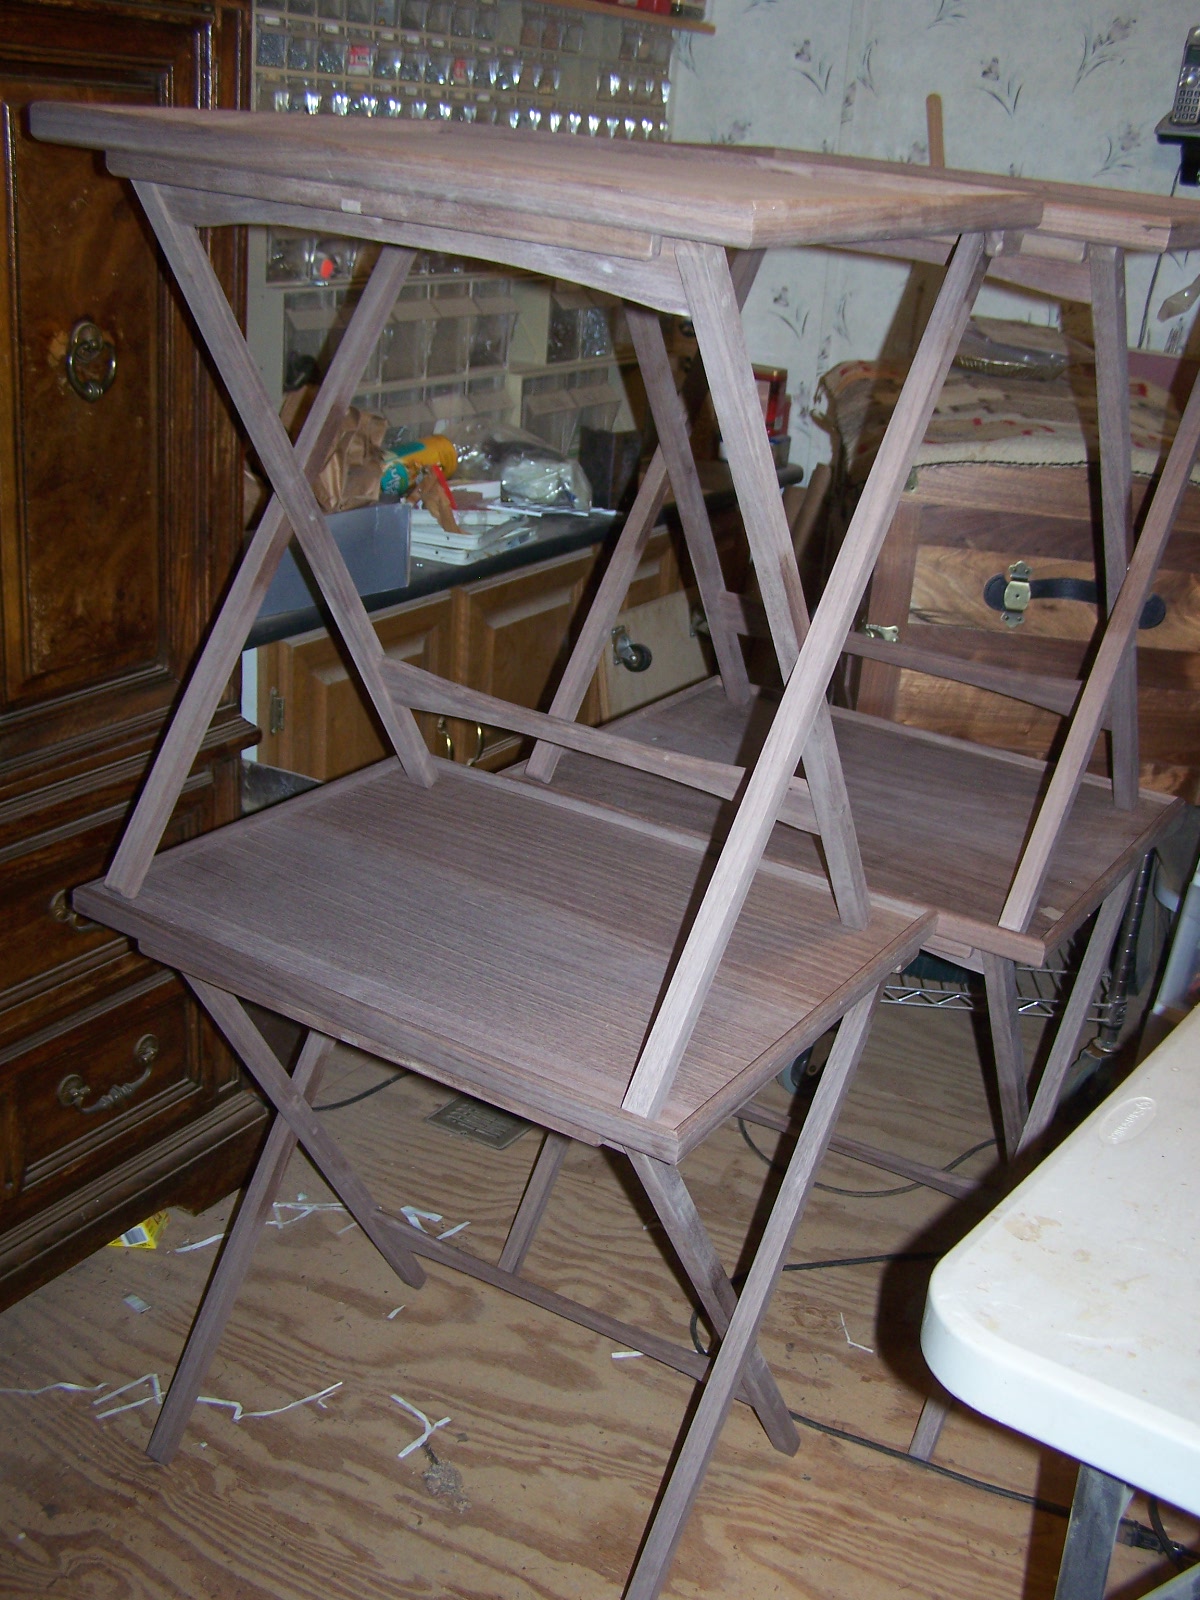

All that remains now is to assemble the stands and construction will be complete.
Friday, March 25
Tray Tables - Latch Blocks

Once the glue has set up some I'll sand them. Then we can begin attaching bases to trays to make tables.
Thanks for stopping in!

Thursday, March 24
Tray Tables - Routing the Trays

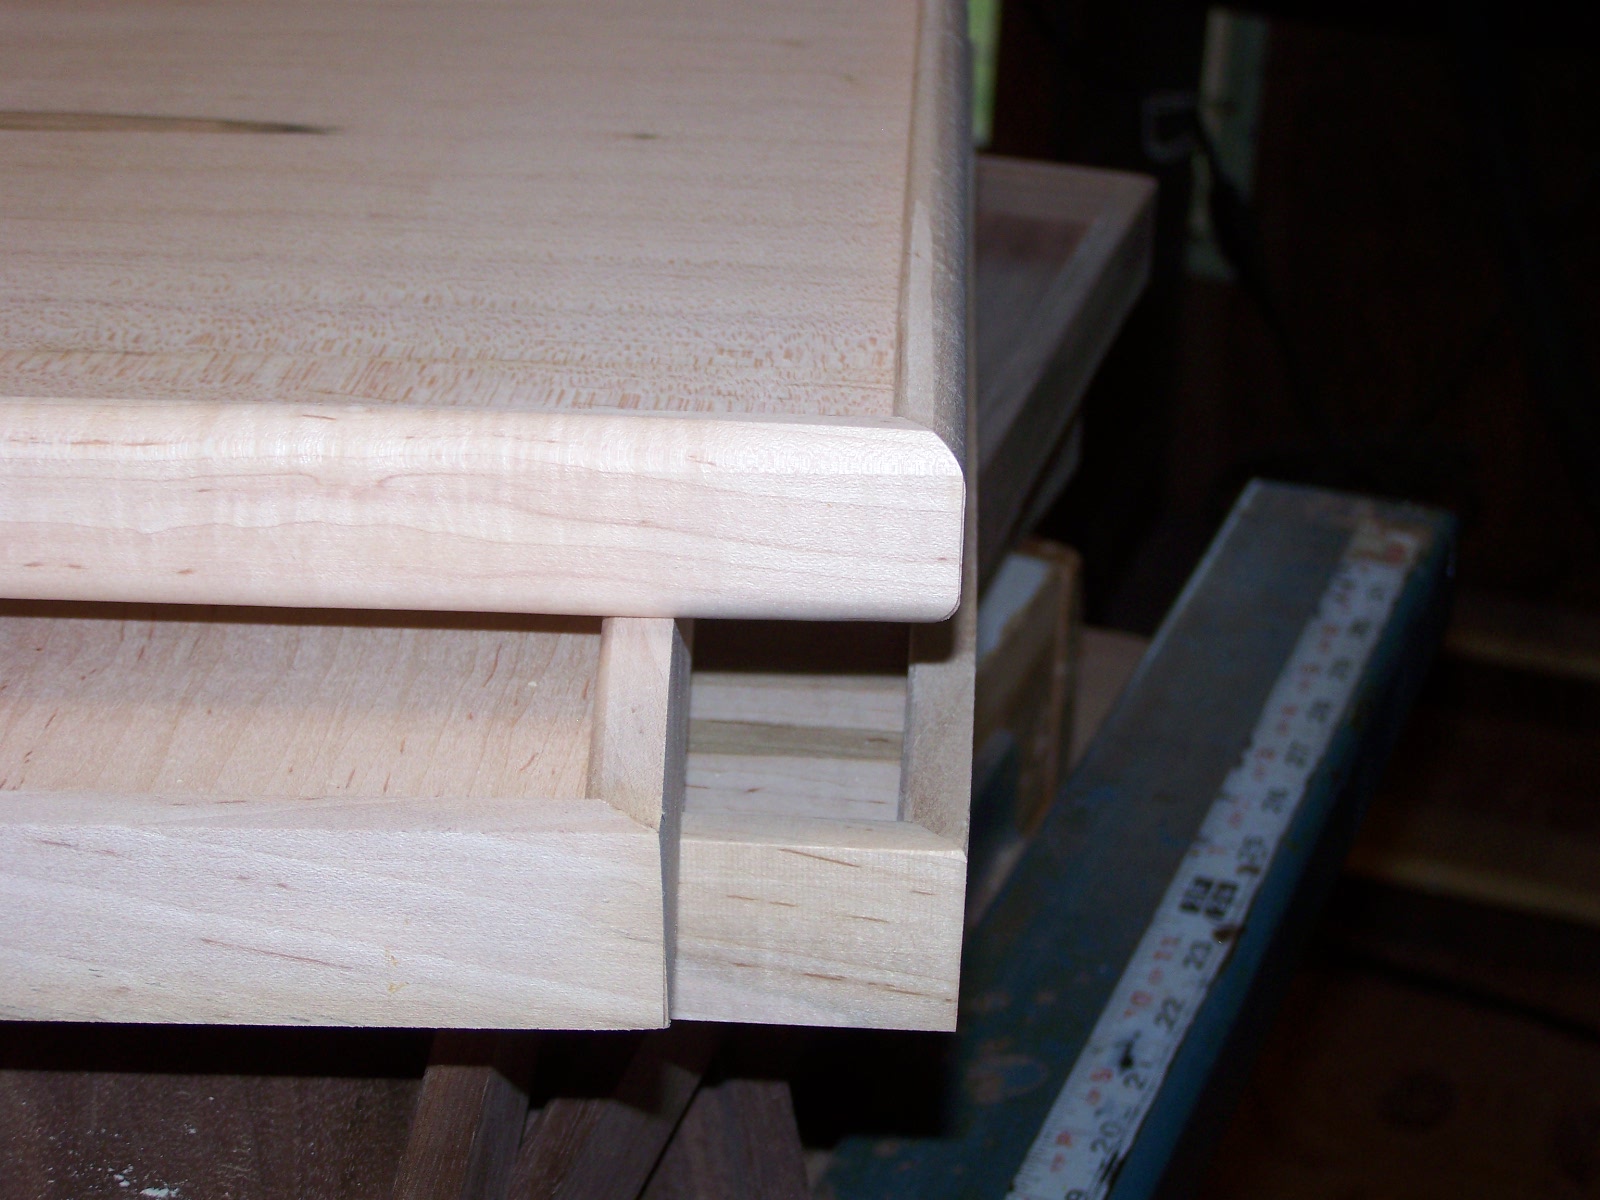 The next step is to set up the router table with a round-over bit and round off the upper and lower outside edges of the trays. This not only makes for a better looking tray but they feel great in your hand when you carry them.
 All done
 |
| Do not ever do this! |


I use a jig to mark the location of the screw pilot hole in each block, drill the piolt holes on the drill press and then I'm out of time again.
Tomorrow I'll make the final component for the tables and may get to start putting them together.
Thanks for stopping in!
Wednesday, March 23
Tray Tables - Assembling Tray

By day's end I have the first round clamped, the other 4 will be done tomorrow: I have only enough of these big clamps to do one set at at time.
Thanks for looking in!
Monday, March 21
Tray Tables - Cutting Tray Rails
First I must apologize for the lack of progress; the sinus infection that had plagued me came back in full force. I went home on Friday intending to take a short nap and awoke 5 hours later. Normally I can not sleep in the day time at all. I spent all weekend napping and resting. Today I'm felling better, but will be glad when I get these tables done and can get away from the woodworking all together for a while. It's breathing saw dust that causes the sinus trouble, and will undoubtedly lead to emphysema as well.
 The tray panels have been assembled and trimmed to size. The tray rail stock has been milled. So now I set up to cut the rabbet on the bottom of the tray panels. This is needed because we changed the design from using 1/8" Baltic Birch for the backer panel to using 1/4" cabinet grade Birch plywood when Katrina hit and the supply of most plywood dwindles and the prices skyrocketed. This cabinet grade plywood is much more readily available tham Baltic Birch ply is. To compensate for the extr thickness, i cut these rabbets.

I start by fitting a piece of the milled rail stock to the edge of the panel and useing a fine point drafting pencil to mark the panel to indicare the amount of wood to be removed. Then I use a depth gauge to measure this dimension and use the depth gauge to set up the blade on my table saw.
 I make one test cut. The final cut will be done in two passes, here I make just the first cut, and only part way along the panel edge. Just enough to do a test fit. Perfect!
 Rather than moving the fence to make the two cuts, I set the fence and lock it in , then use a spacer shim on the first pass. I can not use a stack dado here because the minimum width of the stacked set is too wide for this cut. I could use a sacrificial fence and bury part of the blade in the fence to get the 3/16" width that I need, but by the time I install the dado head, cut a sacrificial fence, and mount it to my saw, I can be half-way done by using this method.
 When I'm done I have a neat raddet around all four edges of the panels.
 Next I set up the chop saw to cut the mitered edges on the tray rail stock. The backer board is something I keep for easy set-up when I make these tables. It serves to eliminate tear-out while cutting the miters, and is marked for precicely the right length of long and shore rails.
This will work great for Jeffreys tables, but Shelly's are considerably larger, so my standard measurement go out the window and I break out the calculator to use relational fractions to determine what the proper lengths should be for those. Then I'll cut another backer board and mark those dimensions on it.
I'll cut a test set, fit them to the panel and see how they fit. If adjustments are needed, make them. When the fit is right, cut all the rest to the same dimensions.
 As I cut rails I fit them to the panels. I like to set the dimensions so the rails are about 1/16" too long. I can trim the excess of easily, but have a little extra in case anything went amis in making the panels.
 The day is done, and all eight table tops are cut and fitted, Tomorrow I will prep them for gluing and begin assembling them into table tops.
Thanks for reading!


I start by fitting a piece of the milled rail stock to the edge of the panel and useing a fine point drafting pencil to mark the panel to indicare the amount of wood to be removed. Then I use a depth gauge to measure this dimension and use the depth gauge to set up the blade on my table saw.
 I make one test cut. The final cut will be done in two passes, here I make just the first cut, and only part way along the panel edge. Just enough to do a test fit. Perfect!


This will work great for Jeffreys tables, but Shelly's are considerably larger, so my standard measurement go out the window and I break out the calculator to use relational fractions to determine what the proper lengths should be for those. Then I'll cut another backer board and mark those dimensions on it.
I'll cut a test set, fit them to the panel and see how they fit. If adjustments are needed, make them. When the fit is right, cut all the rest to the same dimensions.


Thanks for reading!
Wednesday, March 16
Tray Tables - Milling Rails

Keeping the pieces together and properly oriented is vitally important if we are to acheive a "perimeter wrap" sometimes called a "box-makers wrap" which results in the grain pattern of the wood flowing around the tray in an uninterrupted pattern. By using one very long strip to cut the rail pieces we can acheive three perfectly matched corners, but to get all four matched requires this box makers secret. To explain that, I'm going to try a video...
So I spend some time tagging the rails with pieces of masking tape on the outside faces of each set identifying which pieces will the the front rail, right rail, back rail and left rail.
The final step will be to mill the groove on the inside face of the rails into which the panel will fit. That is done with a dado head on the table saw.
 I set up the table saw with a stacked dado head, I test the cut width and cut depth on some scrap wood and tune it in to perfection. When it's ready I bring my tagged rails over and stack them all so the outside faces are up and teh bottoms of teh rails are on my right - which will be against the fence when I make the cuts. By having them all properly positioned before I start milling them, I have less to fool with and can pay more attention to making he cuts properly.
I have a narrow push stick to feed the rail into the blade, a fixed feather board to keep the rail tight against the fence, and a hand held feather board to keep the rail held down tightly against the table saw top, insuring that the groove I cut will be a consistent depth.
 The final step is to set up the router table with a small radius dound-over bit so I can round off the inside top edge of these rails stock. Why just the inside-top edge? Why now? Why not wait until later or do all the edges now? Because the rail height above the panel - once it is installed will not be tall enough to run a router bit on teh inside edge without allowing the top of the router bit (that cap screw that holds the bearing in place) to damage the panel itself, so this edge must be done before assembly. Doing the outside edges after the tray is assembled will make nicer looking corners: no misalignments.
 I run all the strips through, using feather boards to insure a consistant cut, and when I'm done, I have enough rail stock made up and shaped to make 10 tray tables. I only need enough to make 8, but I like to have some extra just in case I mess up. If I mis-cut a piece, and have no fall-back plan, I'd have to start from scratch amd mill out and shape another set of rail stock. If I make no mistakes, I'll tuck the extra away and use it another time.
And that's going to do it for this session. See you next time.
Tuesday, March 15
Tray Tables - Rail Stock

Jointing the edge of the panels makes the edges that must join together straight, square and even. Without this the center joint would be an ugly thing indeed!
Once the first two are done I take them in the next room, apply glue, and use clamps to hold the center joint snugly together while the glue dries.

Then I use a flush plane to remove the glue ridge at the joint and a random orbit sander to sand the area smooth. I'll sand the rest of the panel after it's been trimmed to size, right now I just want it to lay flat and join effectively to the backer panel. I will repeat this process through-out the day until all four walnut panels are completed.

I repeat the process on the walnut blanks.

These are the sort of details that set a custom piece apart from mass produced. Mass produced tables of this design - if any were to be made - would make rails up in bulk and glue them onto the table at random. They would probably use the most bland, boring looking wood they could find for this to hide the fact that nothing matches up.
But my time for this evening is up and I must toddle on. We'll pick this up again tomorrow.
Monday, March 14
Tray Tables: Backer Panels
Today I'll cut the backer panels for Jeffrey's tables and finish gluing up Shelly's half-panels.
 I start by cutting a half-sheet of birch, cabinet grade plywood to rough size on the table saw. First I rip the panel into two pieces 1/4" wider than the finished pieces will be. The cut-off strip from the remaining edge goes in my scrap plywood cart: I use small pieces in making jigs and fixtures.
 Then I mount the big sled on the saw and cut the two strips to rough length. Now I go back and trim all the panels to finished width, but leave them at rough length. We'll cut them to length later.
 I use a sanding block with 100 grit paper to knock the fuzzy bits off of the edges. I do this not to pretty it up as no one will see it, but to prevent those fuzzy bit from getting between the parts and making them fit too tight in the slot - or not fit at all. It's much easier to sand them off now than after the panel assembly is together and problems develop.
 The next step is to apply glue to the backer panel and the ribbon panel - but just down the center - and join them together. I center the ribbon panel on the backer: there should be a 1/16" difference in width on each side between backer and ribbon panel. This provides expansion room for the solid wood ribbon panel. I use clamps and weight to press the panels together while the glue dries hard.
The final step is to cut these assemblies to finished length, sand everything smooth, and pre-finish the edges of the ribbon panel so slivers of raw rood do not show if the panel shrinks up after assembly.
Now, on to making the rail stock.


The final step is to cut these assemblies to finished length, sand everything smooth, and pre-finish the edges of the ribbon panel so slivers of raw rood do not show if the panel shrinks up after assembly.
Now, on to making the rail stock.
Subscribe to:
Posts (Atom)