Friday, October 27
Friday
Today we got close to finishing up the construction of the second book case by building and attaching the toe-kick cabinet and milling the shelf stiffeners.
I also had Marie help me lift the upper case on top of the lower case to be sure the joinery fits snuggly in between. It needs a little tweaking, but nothing serious. I'll take care of that next time, finish building the shelves and give everything a good sanding. That will complete the construction phase.
See you Monday!
Doug
Thursday
Today we went back to making panels – this time for the shelf boards. We took rough sawn 4/4 by 8 foot boards and cut them down into pieces around 3” wide by 37 inches long. These were surface planed, then the edges trimmed square. Then we went back to our router table to cut the glue joints in the planks. This is physical work – keeping the planks mashed flat on the table and firmly against the fence and moving smoothly past the bit. Hard on the shoulders.
We glued and clamped the 6 shelves in two set of three – for three shelves this length requires 12 pipe clamps and that’s all I have. Once the glue sets up for a couple of hours on the first set the clamps can come off and the second set can be glued and clamped.
In between times, I went out to cut up a fallen tree into firewood.
See you tomorrow…
Doug
Mon - Wed
Greetings!
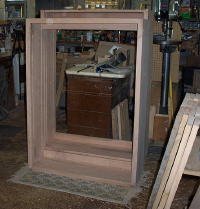
During the first part of this week we got going on the carcass of the second book case. The side panels are done – I made those when I did the sides for the first book case because they are all the same. The top & bottom plates are slightly smaller than the other case, so I left them to be made separately. That has been done, along with milling the face frame parts and assembling the casework with glue and pocket hole screws.
As before, making the panels involves cutting the 8 foot rough-sawn planks to rough length, ripping the 6” wide boards in half, planning them smooth, glue jointing them and gluing the narrower boards back into wide panels.
All this is done to produce a panel that is more likely to lay flat and stay that way.
Till next time…
Doug
Thursday, October 12
Thursday
Over the past couple of days we completed the finish sanding, staining and today we applied the lacquer. The weather was chilly and damp today, so it took much longer than normal for the finish to dry, so this was an all day process although it involved only a few hours of actual work time.
I also got the shelf standards installed. So, this book case is ready to deliver to Dr. Calvin. As soon as we get this one out of the shop, we’ll have room to work on another.
All the best,
Doug
Monday, October 9
Monday
Today we completed the shelves for the right side bookcase. This involved:
Trim 6 shelves to length
Trim 12 stiffeners to length
Lay-out & drill 60 pocket holes
Assemble 6 shelves using glue and 60 pocket hole screws
Install 60 pocket hole plugs
Level pocket hole plugs with coarse sandpaper
Sand shelves to 100 grit & inspect.
 This completes the construction phase of this bookcase. Not the entire project, just this case. But because we don’t have room to build the entire project at once, we are breaking it up into three components. Each is to be finished and delivered as they are built.
Tomorrow we begin the finishing stage.
See you tomorrow,
Doug
This completes the construction phase of this bookcase. Not the entire project, just this case. But because we don’t have room to build the entire project at once, we are breaking it up into three components. Each is to be finished and delivered as they are built.
Tomorrow we begin the finishing stage.
See you tomorrow,
Doug
Thursday, October 5
Thursday
Today we dressed out and trimmed the shelves we’ve been gluing up and got the shelf stiffeners milled as well.
This was a shorter day than normal because there is a Chamber of Commerce function to attend this evening and we have volunteered to help with it.
Tomorrow I must spend the day at Treasures Of Appalachia as shopkeeper.
See you Monday,
Doug
Wednesday, October 4
Wednesday
We’re working on making the shelves for Dr. C’s bookcase today.
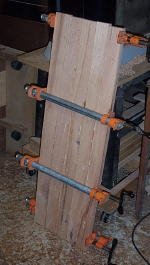
The process is to take the narrow boards we milled yesterday and run them through the router table, which is outfitted with a special bit, to produce the edge-to-edge glue joints. It takes 5 boards to make a shelf, so we apply glue to enough boards at a time to make one shelf, align them and apply clamps. Repeat until we run out of space to put the glued up panels or we run out of clamps.
It takes a couple of hours for the glue to set up sufficiently to safely remove the clamps and use them on another set. We have six shelves to make for this book case.
See you tomorrow,
Doug
Tuesday, October 3
Tuesday
We bought ourselves a new mattress set last night, and this morning was the first time in a long time that I didn’t wake up feeling like I’d been hit by a truck. We hauled the old set off to the local “convenience center” then Marie dropped me back by here and headed out to do her thing.
Today I’m working on making the shelves for this book case. That means starting with rough lumber, cross-cutting lengths that are just a wee bit longer than the finished shelves need to be, then ripping those pieces in half lengthwise, surface planing them to 7/8”, glue jointing them, and gluing them back together into wide boards for the shelves.
 Why cut wide boards into narrow pieces just to glue them back together? To prevent the shelves from curling up. By alternating grain patterns so they will fight against each other should they decide to “move”, we can greatly reduce or eliminate the chance that the shelf will twist or cup.
My day’s plan ran into a snag when a neighbor, who is ill, needed some assistance and I took time to help. I did get one shelf glued and clamped. I’ll work on the others tomorrow.
See you then,
Doug
Why cut wide boards into narrow pieces just to glue them back together? To prevent the shelves from curling up. By alternating grain patterns so they will fight against each other should they decide to “move”, we can greatly reduce or eliminate the chance that the shelf will twist or cup.
My day’s plan ran into a snag when a neighbor, who is ill, needed some assistance and I took time to help. I did get one shelf glued and clamped. I’ll work on the others tomorrow.
See you then,
Doug
Monday
Today I milled the parts for and built the toe-kick cabinet that goes in under the lower part of the book case. I sanded it to 100 grit and attached it to the lower case.
Then I made plugs for the pocket hole screws that may be visible and went back around and plugged all those holes and sanded them smooth.
Then I sanded the rest of the book case, inside and out, to 100 grit. This is construction sanding. I haven’t gotten into the finishing work yet. I’m just smoothing things out, removing glue stains, and looking for any problems.
I scared myself silly this afternoon. I have made allowances for Dr C’s baseboards so they will not have to be removed, but while I was sanding I realized with a start that I had not allowed for crown molding. These cases will go clear to their ceiling, what about the crown molding?!?
 However, a look at the photos of the room this will go into shows that the room does not have crown molding. We have seen a number of houses recently that do have it and it must have just stuck in my mind and my mind played a cruel trick on me. But, all is well now. And onward we go.
This completes the case construction for one book case. I still have to mount the shelf standards, but that will not be done until after the case is stained. So I’m setting the cases aside (as much as I can in my small shop) and going to work on the shelves tomorrow.
See you then,
Doug
However, a look at the photos of the room this will go into shows that the room does not have crown molding. We have seen a number of houses recently that do have it and it must have just stuck in my mind and my mind played a cruel trick on me. But, all is well now. And onward we go.
This completes the case construction for one book case. I still have to mount the shelf standards, but that will not be done until after the case is stained. So I’m setting the cases aside (as much as I can in my small shop) and going to work on the shelves tomorrow.
See you then,
Doug
Subscribe to:
Posts (Atom)