Tuesday, October 26

Trailer: Test Fitting the Racks

This morning I am back at work on David B’s storage trailer.

My first task of the day is to sand the racks smooth.  Here I come up against my first quandary; how much sanding should I do?  The furniture-maker in me wants to hunker in and sand until it is all satiny smooth and a pleasure to touch.  But that means investing a lot of time and effort; and time is money.  I don’t want to gouge my customer by investing more time than is needed and running up the bill.  This is, after all, not a piece of furniture but a storage trailer.  Although I have seen many articles about woodworkers who built a workbench or cabinet for their shop and employed all the finest furniture making techniques in building it – yielding a very classy, show-piece, piece of shop furniture and an immense source of pride – no one was paying them an hourly rate to do so.  Perhaps here “utility” is the key phrase.  So, I sand away all the fuzzy bits and knock sharp edges off to help prevent splinters, but don’t go crazy with it.

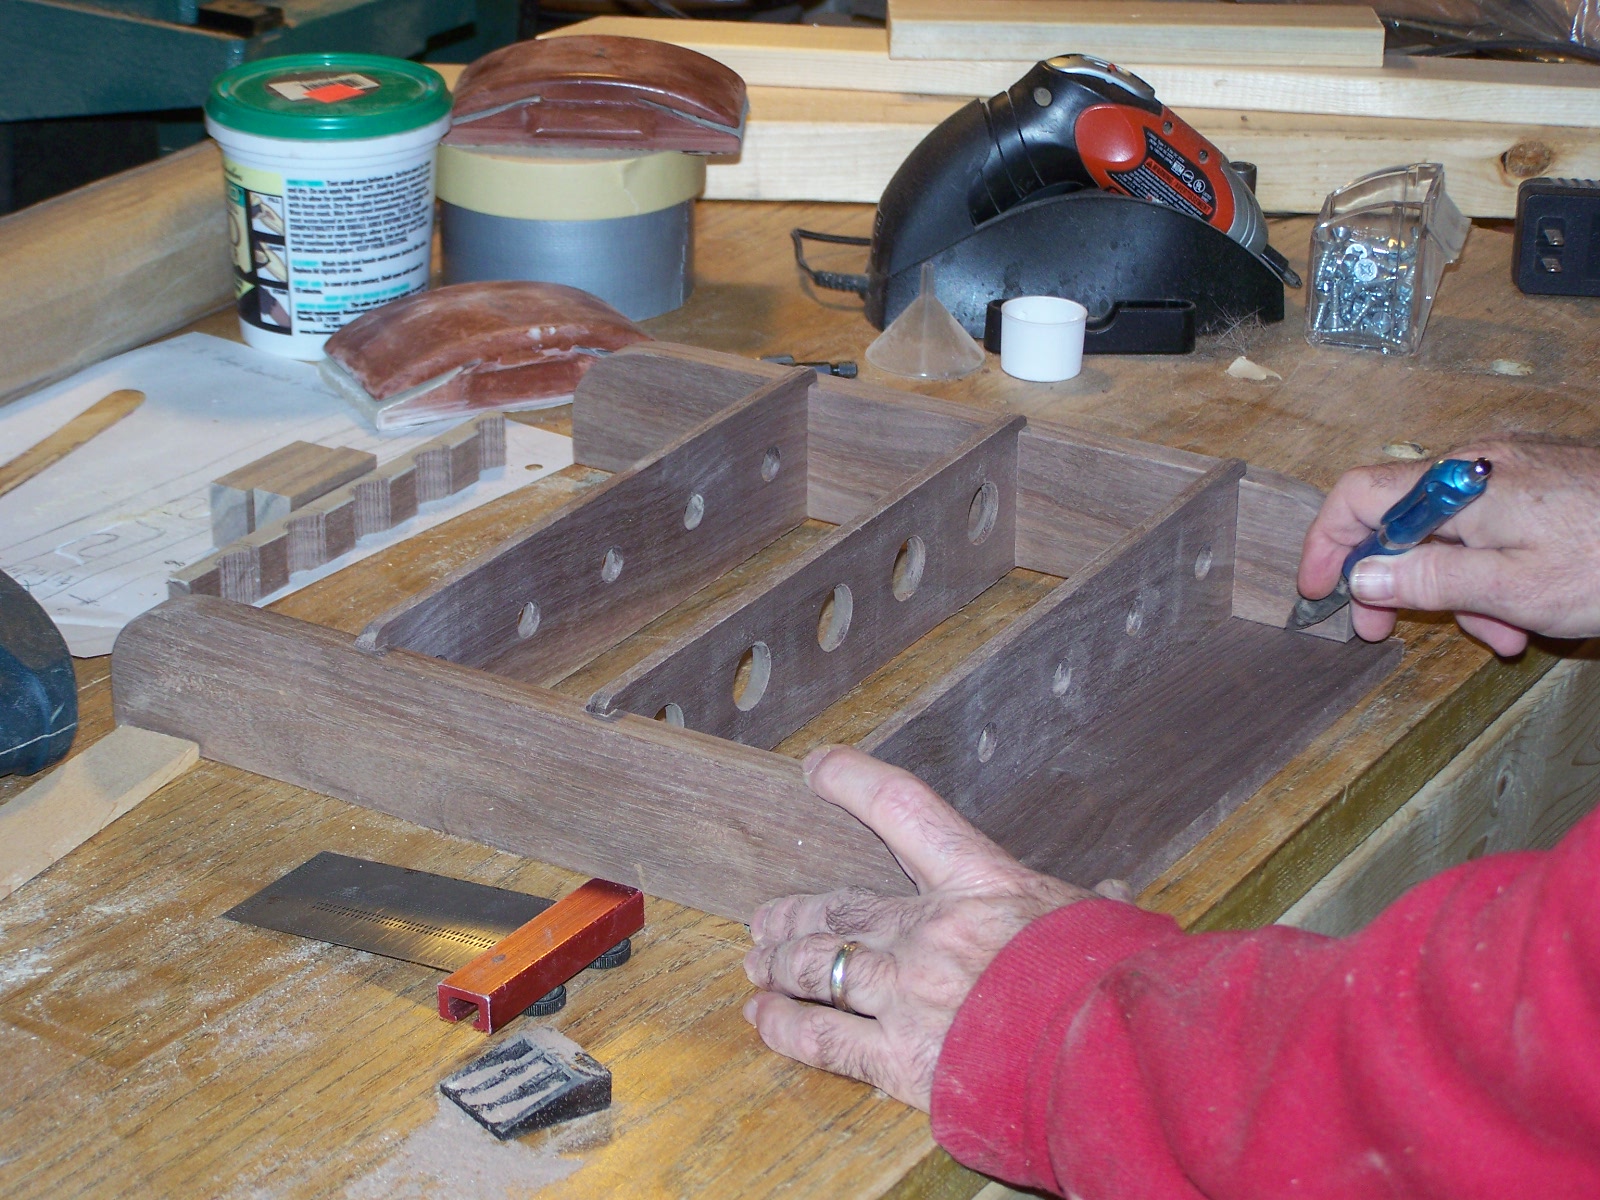
Next I drill pocket holes in the uprights of the racks.  The blue jig clamps to the wood and guides the drill bit, chucked into a portable drill,  at the proper angle and to the right depth.  The special bit is stepped, the wider part drills the main pocket allowing the screw head to be sunk below the surface of the wood.  The smaller stub on the end of the bit drills the pilot hole for the screw shank.  The flat end of the larger hole provides a shoulder where the washer headed screw seats.  Because it is flat, not V shaped like a normal flat-head wood screw, there is no tendency for it to split the wood when tightened. 

I drill two pockets at each attachment point, one from each side of the rack.  This will prevent any tendency at all for the screws to twist the rack around to the side.  This is not normally a problem with pocket hole screws, but in this case a little overkill won’t hurt anything.  And since I’m not gluing the rack in place (David may want to move them some day) I want these connections to be as sturdy as possible.  A little touch-up sanding and I’m ready for a test fit.

Using yard tools I have on hand, I determine how far in from the ends each rack needs to be, check to be sure I won’t hit any steel ribs inside the plywood wall covering, and mount the racks.  I am pleased with the rigidity that this system gives the racks.  I install some tools to check the fit.  Wide headed tools, like a leaf rake, could cause problems by encroaching on the space for other tools, but that can be gotten around by simply flipping the tool above and below around so the handle end is adjacent to the rake head.  (I actually planned it that way) Vertical spacing seems to have worked out properly as well.  Each implement can be lifted clear of the hook without running into the tool above it, yet little space is consumed as excess clearance.  I believe the hooks are deep enough to contain the tools even as the trailer bounces along a rough road.  Within reason anyway!

I’d say this is going to work.  Therefore I need to make four more racks just like these, then I will turn my attention to the swing wall they will mount on.

One last note: D-handle tools (grain scoop, short spade, etc) do not go in this rack, only long, straight handled tools.  The D-handle tools will go elsewhere.

Thursday, October 21

Beginning the Finish

I spent the morning getting hooked up with another publisher: Triond.  They provide content to a couple of dozen E-Zines and Elana, a fellow writer on Hub Pages says they pay pretty well.  To set p an account, they required an original, publishable article, so I had to write one.  This was important because as woodworking has slowed to a crawl, I've been going back to my writer's roots.  And I've done pretty well  considering.  It just takes time to research and write good stuff, then more time for Google to find it and start sending readers my way.  The number of readers determines my pay rate.  Occasionally I get a magazine gig like Going Pro As a Woodworker for Wood News Magazine; a ten part series - that was fairly lucrative.  Most everything else is a little here and little there - write enough and it starts to add up.

This afternoon I'm applying lacquer to David P's bottle stopper rack.  It will take two coats, allowed to dry between than scuff sanded followed by a third and final coat.  When he final coat is dry I will attach the loop hangers and get it ready for packaging and shipment.

If all goes well, I'll get all of that done before I go home tonight so I can schedule a pick-up for tomorrow.

Wednesday, October 20

Stopper Rack Assembly

I start off today with mounting the router bit I’ll need for rounding over edges on the shelves.  Since it is a ¼” shank bit I need to install an adaptor into the chuck – the chuck is made to accept ½” shank bits – then install the bit and set the height.

I round-over the front upper edge and the upper edges of each hole on each shelf, then set he shelves aside for sanding in a little while.

But first I mount a 5/16” wide dado head on the table saw and tune it in for width and depth of cut on scrap wood.  Then I use the special jig to cut the dadoes in both side pieces.  This jig insures that not only are the shelves equally spaced, but the dadoes are square to the long edges (no twisted shelves) and that they are perfectly placed vertically to prevent slanted shelves.

The final piece to make is the stiffener apron under the bottom shelf.  I assemble the rack and take the width for the apron directly from the rack, then cut that part to length and finished width.

I slip the apron into a template jig and use a band saw to cut away most of the waste of the arch, then use the jig with a piloted straight bit in the router table to take the arch to finished size and shape.

Now comes the *really* fun part: sanding.

All the parts are hand sanded starting with 100 grit paper and working up to 220 grit paper.  This takes a while.

When all the sanding and inspecting is done, I break out the glue pot, a small artist brush and some clamps.  Carefully applying glue inside the joints, I assemble the rack, making sure all the parts line up along the back, and apply clamps.

I’ll let this assembly set overnight to be sure the glue sets up well.  I’ll spend the rest of the afternoon working on David B’s  trailer.

Tuesday, October 19

Rolling On

I dug out the template set for the wall hung stopper rack, enough walnut to make the project and reviewed David P.’s specifications.  His is a custom rack not only in the sense of it being all walnut, but also the number of shelves, the hole sizes and the height of the top “ears” are all to be made custom.  We can do all that with little fuss.  The only thing that gets messy (thus expensive) is if we are to change the spacing between the shelves.  The complicated looking device in the upper right of the photo is the jug that holds the side pieces as I cut the slots for the shelves into them.  It took me about a day to design and build that.  Changing the shelf spacing means building another jig set up for the different spacing, thus investing several hours at the shop rate.  Unless the new jig is expected to be used for other racks this cost gets billed back to the customer.

In searching out the parts I have on hand for Donald’s TV Tray Table, I found that the parts I have made up are for an all cherry table, not a classic.  “Oh, Rats!” thought I.  Then it occurred to me that when I  built our first pair of classic tables -- for photographic purposes -- one of them ended up in service in our living room as an end table.  Where did the other go?  I found it tucked away safe and snug in storage.  I’ll crawl up into the loft of the lumber shed this afternoon and get out one of the custom boxes we had made up for shipping these tray table sets.  Of course, Don only wants one table, so I’ll cut the box down some to reduce the unneeded bulk (and lower shipping costs a little).

I’ll go ahead and package Donald’s table – just to insure it doesn’t get banged up lounging around in the workshop – but will wait to ship until both pieces are ready – FedEx charges us a fee every time they must come up the mountain to our shop for a pick-up.  That should be before week’s end.

Then I will turn to the 12” x 18” x 4” memory box that Brian O needs and of course, back to David B’s trailer.

By Day's End

I have the table securely packaged and ready to ship.  I have not run the label yet because the software expects the package to be picked up by the next day and when it's not it starts popping shipping exception reports.  Besides, it will send Donald a notice that his order has been shipped - and it hasn't.  Not really.

I also got the parts for the stopper rack roughed out.  I was a little concerned about being able to use a router bit to round over the upper edges of the holes - my usual bit for that has a 3/4" diameter guide bearing and the smaller holes are only 1/2" diameter.  That won't work.  But I scrounged around in a drawer of old 1/4" shank bits and found a bit with a 1/2" diameter bearing and about the right radius of round-over.  I'll use that and everything will be just hunky-dory.

Time to clean up and head for home.

Monday, October 18

Christmas Rush

The Christmas rush is upon us!

I am speaking facetiously; for in years past at this time of year we would have many orders piled up and more coming in every week.  I'd be watching the schedule to determine when I reach the point that we can not hope to have everything built and shipped for arrival before Christmas and start refusing orders that absolutely MUST be delivered before then.

In 2008 it slowed down.  I still had work to do, but it was not necessary that I work 12 and 14 hours days 6 days a week to keep up.

In 2009 I got to stay home and help my wife cook for Thanksgiving and decorate the house for Christmas.  I rather enjoyed that.  It looks like I will get to enjoy that privilege again this year.

However, just when we were planning to close the doors and begin dismantling the web site, things started to perk; just a little.

David B. asked me to do the trailer project that is underway.  Marie wants a computer desk.  In just the past few days, David P. ordered a bottle stopper rack, Don S. ordered a tray table and Brian O. ordered a keepsake box.

We keep saying to one another that we will discontinue the custom made items because the tremendous amount of time that goes into a one-off piece makes them discouragingly expensive.  This was not a problem before the economy tanked because there were still people willing to spend large sums on something they really wanted that was well made.  But since then, demand has dropped sharply.

If the past couple of weeks are any indication, maybe we should not mothball the equipment just yet.  Maybe the economy will pull out of it's tailspin sometime soon.  I don't expect it to soar again for a long time, but just getting it's nose pulled up away from the dirt would be an improvement.

So, I'm going to spend the afternoon culling my on-hand lumber supply and parts stash to find the materials I need to make the bottle stopper rack and tray table - I think I have most of the parts I need for the table made, just need to complete them and assemble the thing.  If I have time, I'll mount the first two tool racks in David B's trailer and see how that works out before I make more.  If re-designing is needed, it's best to find out now rather than after I've made all six racks.

Thursday, October 7

Trailer – Getting Started.

Today I formally start work on fitting out a trailer with storage devices so that David, a landscaper will be able to better organize the trailer and have improved access to his tools and equipment.
I’ve had possession of the trailer for a while to take measurements, work up a plan of attack and order the supplies and hardware I’ll need. As you can see the interior is now quite empty. Equipment storage was just a matter of tossing everything inside and digging out what he needed when he needed it.

I also have a list of landscaping tools and equipment he will be wanting to store in the trailer to help me design appropriate storage. The problem with custom designing storage for a set of tools is that if you don’t allow for expansion or some flexibility, the whole thing becomes obsolete as soon as a new tool is purchased. Also, if I rig it so that it is a system of “this tool has to go here and no where else” then that can be frustrating when a number of tools have been taken out and have to go back exactly where they came from or they won’t fit.

I start by designing the “rack” that I’ll use to hold the tools and making a template out of thin plywood. After it’s laid out I cut away the waste with a jig saw and sand the cuts smooth so my pencil will run along the edges without snagging. I leave the bottom of the hooks as solid circles with a hole in the center that will be used to punch the center of the circle so I can use a Forstner bit to make a nice smooth, round bottom of each hook.

Then I cut some four foot blanks from a piece of ¾” cabinet grade birch plywood. This plywood is solid birch (quite hard), has many thin layers and is solid all the way through, unlike construction grade plywood which is made of fir or pine (quite soft) does not hold together well when cut up and has many voids inside. The birch plywood is very expensive, but will do the best job of these hook racks which need to be dimensionally stable and lot susceptible to snapping off if banged with a tool as solid lumber hooks might be.

I use the template to lay out the shape and mark the center of each hole, then use a Forstner bit to bore the holes. This bit bakes very clean, smooth holes with little or no tear-out.

Then I take the blank to the work bench and cut out the hook shapes with a jig saw. It is slow going in this ¾” thick birch plywood. I spent the afternoon making just two racks.

  
But that is enough to test them out and make sure they’ll work as predicted. Looks good. By alternating tools so that the “head” on alternate levels are pointing in opposite directions, there should be little difficulty on storing tools of various sizes in these racks. The arms of the hooks are tall enough to keep the tools from jumping off the hooks while the trailer is being towed over rough roads or off road.

Time to call it quits for today, two more sets to make tomorrow. See you then!